But we can sense a small change in her attitude. She has to wear a skirt as part of her school uniform now, and all the girls in her class are in skirts, so there can be no argument. And she's now agreed she'd like a new dress, so long as it isn't frilly, or pink, or in any way princessy. (She caught sight of her youngest cousin's dress, see here, and said determinedly "I don't want THAT dress!" We pointed it it was far too small for her any way.)
So here's what I came up with for her. It's red, which she likes, and it's not frilly (has pleats rather than gathers), and it has nothing itchy inside. Yet it is quite stylish. Let's keep our fingers crossed she'll wear it now!

To find out how you could make something similar, read on.
The free patterns I had used for the other girls weren't going to work for Fleur. Although only just 5, she needs a size 7-8, and the other patterns didn't go up to this size. Eventually I found the free DIY Holiday Dress pattern from Shwin and Shwin which goes up to a size 8. I didn't want to make the wide balloon skirt, I just needed a bodice!
I've used a lot of the Shwin and Shwin patterns successfully in the past, this one, with sleeves, needed quite a bit of alteration. When I alter patterns, I annotate them with what I've done, in case I ever want to replicate. For example:

I found the sleeve was too narrow for the armscye, so I needed to widen it. I think it's always a good idea with free patterns with sleeves, (or even paid for ones!) to measure the armscye seam allowance, and the seam allowance on the sleeve. If the sleeve is a bit bigger, that's fine, you normally ease them to fit, or even gather them to fit, But if the sleeve is too small, it really isn't going to work!

There were some other changes I made as well. On the bodice, I used the size 7 neckline and shoulders (she is only 5). But I also made it even longer than the size 8 length. It seems to be a high waisted style, and I wanted a normal waistline. So, having measured Fleur from neck to back waist, I added 1 1/2" to the bottom.
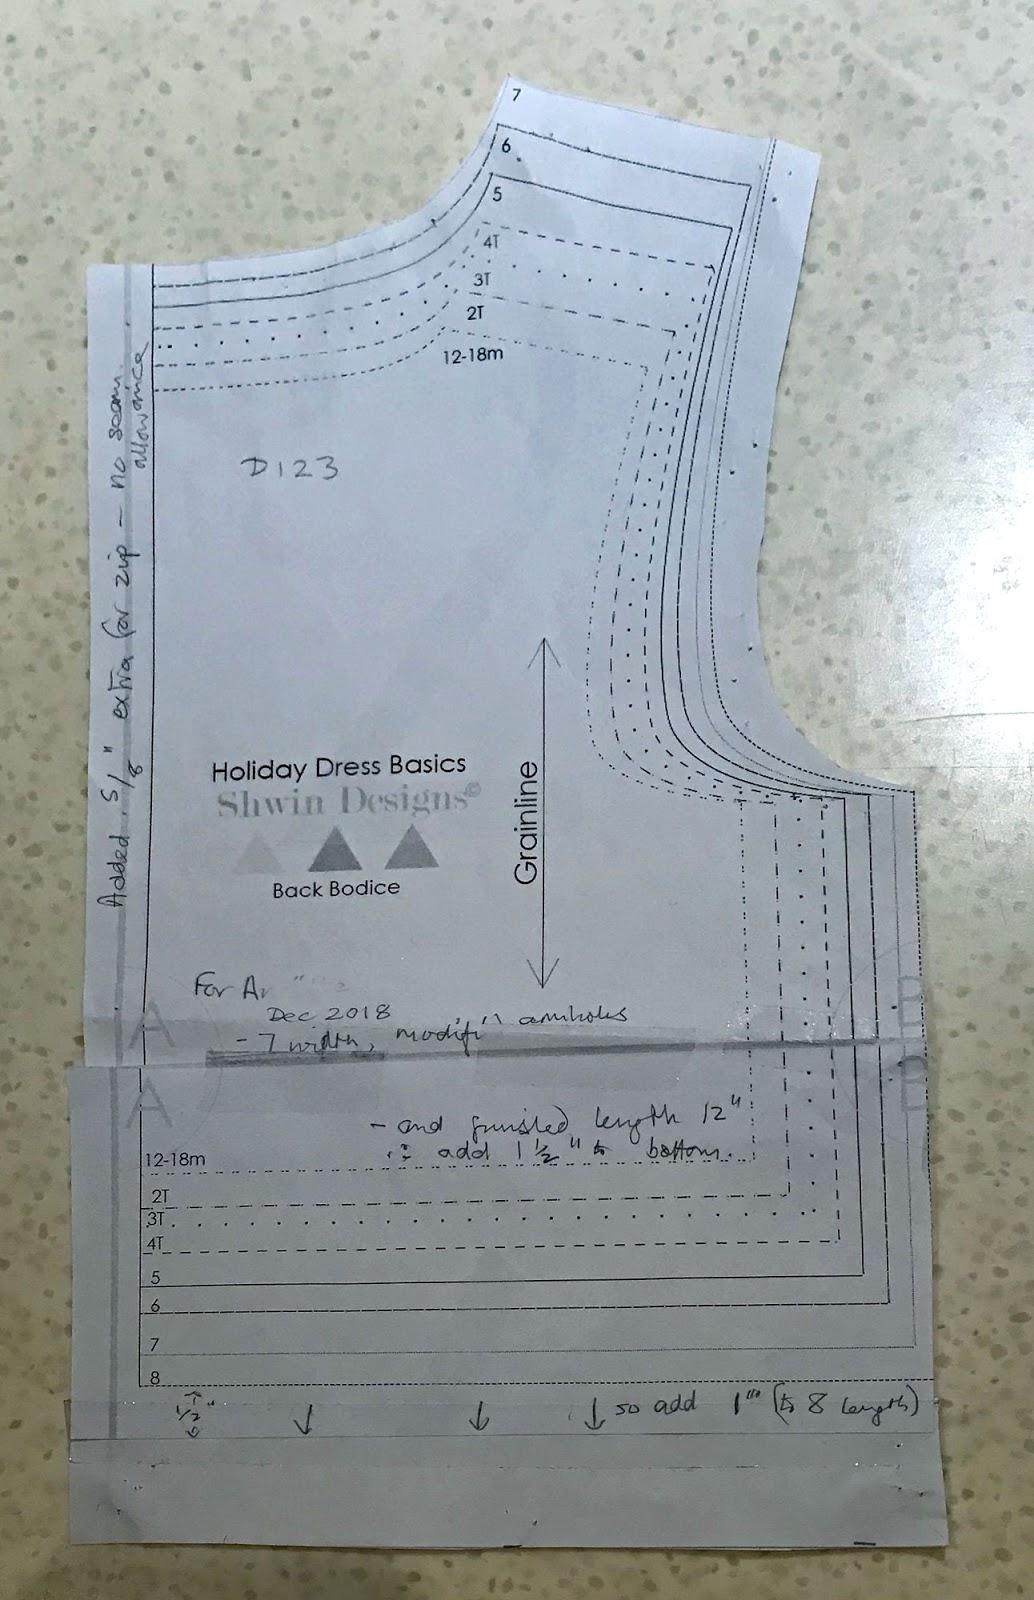
The pattern seems a bit narrow on the back for a broad shouldered girl. I think it would be fine for a sleeveless dress, but for a dress with sleeves, you need the back to be a bit wider across from armhole to armhole so the sleeves don't pull too much. I achieved this by first adding an extra 5/8" seam allowance centre back for the zip. I also added width to the armhole. This reduced the armscye measurement slighlty, but it was already too big for the sleeves, hence my changing the sleeves.
Having pretty much massacred the pattern. I was ready to cut out! I used more of the red tartan used on one of Scottish Jane's birthday dress last year (hope Jane won't mind!) and a red silky lining. (I've no idea what that fabric is, maybe acetate? I just ask for lining in the store.) You can see these on the inside out finished dress.

So I cut two sleeves, two bodice backs, and a bodice front, twice, in the outer and lining fabrics. Using a heavily chequered or striped fabric like this has the advantage that it's easier to cut straight lines, On the other hand, you have to be careful to match the stripes. I think I did a reasonably good job on the back! Further down you'll see that on the side seams too.

Fleur had declared 'no frills', but I thought a bit of decoration would not go amiss. I decided on piping round the neck, and a mock placket on the front. I'm very happy with how these turned out.
First, I ironed on a bit more of my iron-on interfacing to the back of a spare piece of the lining fabric. I marked on it with a washable marker, the shape I wanted the placket to be. (I left a gap at the top edge here for seam allowance.)

Because the lining fabric was very thin, I wanted it double thickness. So I folded it right sides together along the bottom of the three lines you see above. I then stitched round both sides and the point, leaving the straight end open. I clipped the points off (without cutting the seam!) and then turned it the right way out and pressed it.

If you used a thicker fabric for your mock placket, you could avoid having a double layer by just cutting around the shape with a 1/4" + seam allowance, and press the seam allowance towards the back. If you did, this, I would then tack round so stop the seam allowance from springing out again.
I sewed on three buttons, then I placed it centrally on the front bodice, and oversewed close to the side edges and the point. (No need to oversew the top edge.)

The next step was to make the shoulder seams of both body and lining. There is no need to finish these concealed seams unless the fabric is very fray-y.

(In the next picture you can perhaps also see how I've attempted to match the side seams horizontally - the first stripe below the armholes is in the same place back and front. )

I then made some piping, again using the lining fabric. I pinned and then tacked the fabric round a length of piping cord.

Then I pinned and tacked it it to the seam allowance as close as I could to the cord, and sewed it round the neckline using my zipper foot. I finished the ends by tucking under to line up with the back centre seam above the zip.


Then I pinned and sewed the necklines of the outer and the lining right sides together, stopping just short of the centre line, so I would be able to turn in the lining.

I clipped the curves on the neck, turned the lining to the inside, and pressed it - the piping is now on the outside. You can undersew the seam allowance to the lining, or oversew as close as possible to the piping - that will require your zipper foot again.

Now I was ready to sew up the side seams, from the cuff end of the sleeves down to the waist.

I left the centre back lining loose where it will attach to the zip for now, but pressed all the seams, and stuffed the lining inside, including the arms.
Then I ran a basting stitch all the way round the top of the skirt within the seam allowance to hold the pleats in place.
When it came sewing up the back seam, the matching was not quite as perfect, I needed a bit of overlap of the pattern and the pleats at the back. Her waist size was not a round number of whole pleats! But, hey, it's the back, and I don't think many people will notice.
Again, for the top few inches which would be unpicked once attached to the zip, I used a long stitch, easy to unpick.
I attached the skirt to bodice, matching the pattern at the front.

Then I completed the attachment of the zip, much easier now I could open it partway, and unpicked the top bit of the skirt centre back seam where it covered trhe zip.
I hand-sewed most of the bodice lining to the seams, both at the sides of zip and at bottom of the bodice, except the ends nearest the zip, through which I had yet to thread elastic. The bodice lining now concealed the waist seam, and all the raw edges inside the bodice.
I threaded 1/2" elastic through the channel at the waist, and attached both ends of the elastic, having pulled it up to fit Fleur's waist quite loosely. (She doesn't like tight things). I also finished attaching the remaining lining to the side of the zip.
I tacked a couple of stitches round the armscye to hold the lining in place.
I hand finished the cuffs by turning up the hems, and trimming the lining to reduce bulk.
Next, I sewed a button on, to complete the neckilne.
And finally, the last of my Christmas 2018 dresses was done!
To my enormous relief, this dress seems fit Fleur perfectly, and what's more it is comfortable. I could perhaps have made the sleeves a little shorter, but she grows so fast. Her Mummy didn't want any adjustments made, and likes the neck detail. (So do I.)


And does she like it? I think you can say so! We love that she is so happy.

And although I don't have pictures, I've seen her wearing it again after Christmas - by then an even better fit.
No comments:
Post a Comment