Baby Gym - A few ways to make your own

Our latest 'baby gym'
When our little grand-daughter was coming to stay, we wanted
a baby gym to entertain her. It had to be simple, and also transportable.
When her mother and auntie, our daughters, were tiny, their Daddy had made them a very sturdy baby gym stand. Here's one of our daughters enjoying the very thing!

So we wanted to be able to provide something that wouldn't cost the earth, but would provide plenty of safe entertainment for the baby.
When her mother and auntie, our daughters, were tiny, their Daddy had made them a very sturdy baby gym stand. Here's one of our daughters enjoying the very thing!

So we wanted to be able to provide something that wouldn't cost the earth, but would provide plenty of safe entertainment for the baby.
Below, I will write about how we made the Mark 1 version for our own daughters, other nice examples of home made baby gyms I found, and finally, how we made our latest versions for our grandchildren.
When we had our own first child, we were given what was then actually described as a baby gym, but which was more or less what I think is now called an activity bar. So many of the activity bars or toy arches these days seem to be single use, requiring you to buy others for different purposes. The one we had was just a plastic rod with some plastic dangly things attached, including sort of grab handles at the ends, and a couple of things that made noises – a bell and a rattle – when swiped. The plastic rod had webbing at each end so it could be attached to pushchair / stroller, cot, carry cot etc. In those days we didn’t have car seats like there are today, but it would have worked there too.
We were too poor, or maybe too mean, to pay out for a full ready-made activity centre – besides which, we wanted it to be very flexible in use. Hence Daddy making the baby gym stand, which we could put the changing pad on as a playmat.

The main stand consisted of a wooden base – plywood I think – and corner blocks with wooden dowelling rods in. You can see the blocks and dowelling rods above. The changing mat just fitted in between along the diagonal. We attached the webbing to the dowelling rods on our stand. It then served to amuse baby while being changed but also while just lying awake and playful.
To make your own, you need:
Here's the plan. The base (we are guessing from memory) was about 50cm-60cm (about 21" to 24"). It doesn't matter exactly as long as there is enough space between the blocks for the changing mat to fit snugly. Sand it down so it's smooth. Add cubes or blocks of wood in two opposite corners, glued and preferably screwed onto the plywood base.


Then the rods fit into holes drilled into the blocks - make them a tight fit. You could glue them, but I think we didn't because then the whole thing could be made more portable by removing them. Attach webbing or a baby activity bar between the dowelling rods. Put the changing mat in between. We could also use the bouncy chair in between.
When we had our own first child, we were given what was then actually described as a baby gym, but which was more or less what I think is now called an activity bar. So many of the activity bars or toy arches these days seem to be single use, requiring you to buy others for different purposes. The one we had was just a plastic rod with some plastic dangly things attached, including sort of grab handles at the ends, and a couple of things that made noises – a bell and a rattle – when swiped. The plastic rod had webbing at each end so it could be attached to pushchair / stroller, cot, carry cot etc. In those days we didn’t have car seats like there are today, but it would have worked there too.
We were too poor, or maybe too mean, to pay out for a full ready-made activity centre – besides which, we wanted it to be very flexible in use. Hence Daddy making the baby gym stand, which we could put the changing pad on as a playmat.
The main stand consisted of a wooden base – plywood I think – and corner blocks with wooden dowelling rods in. You can see the blocks and dowelling rods above. The changing mat just fitted in between along the diagonal. We attached the webbing to the dowelling rods on our stand. It then served to amuse baby while being changed but also while just lying awake and playful.
To make your own, you need:
- A square of plywood for the base
- A couple of cubes or blocks of wood
- Dowelling rods
- Glue
- Screws, if you want to make it extra sturdy
- A nappy changing mat, bouncy chair, or just a blanket
Here's the plan. The base (we are guessing from memory) was about 50cm-60cm (about 21" to 24"). It doesn't matter exactly as long as there is enough space between the blocks for the changing mat to fit snugly. Sand it down so it's smooth. Add cubes or blocks of wood in two opposite corners, glued and preferably screwed onto the plywood base.
Our blocks look from the photos to have been about 4" x 3", rather than 4" x 4", but again, the exact size doesn't matter as long as there is space between them for the changing mat to go diagonally across the board between them.
We also produced other ‘activity bars’ of our own. I recall
that we rigged up strong elastic tied across the cot bars, or to these
dowelling rods, and hung a collection of different toys or objects – using
bulldog clips, I think! Health and Safety might not approve of this nowadays,
but we never had any accidents. The great advantage of this was that you could
ring the changes ad infinitum.
So when the time came for us to want to amuse our visiting grand-daughter, I hankered after something similar. As I usually do, I started with an internet search. I turned up a couple of lovely home-made activity centres based on a playmat or quilt. Here's one of my favourites. So thanks to Shannon for her ideas. (She now also has a square one as well as a round one on her blog.)
So when the time came for us to want to amuse our visiting grand-daughter, I hankered after something similar. As I usually do, I started with an internet search. I turned up a couple of lovely home-made activity centres based on a playmat or quilt. Here's one of my favourites. So thanks to Shannon for her ideas. (She now also has a square one as well as a round one on her blog.)


Thanks to Amber-Lou for that one.
Since I didn't plan enough in advance to make a nice quilted playmat, I had in mind more of a separate frame, as we'd used before. I really like this 'good-looking wooden play gym' from MThanded.blogspot.uk. I particularly like the idea that it can also be made to serve as a play tent frame later. Thank you to Rachel and her clever husband for this one. It looks beautiful and is very ingenious. You would have to use solid enough wood for the side supports so that you don't get any side to side wobble. Unfortunately I didn't find this in time. If I’d had the time, I would have loved to make one of these. But I would probably use the design in future (oh, all right, my husband, then!)

However, time was short, we needed something simpler, and it had to be able to be dismantled and transported as well.
Then I came across this, which is absolutely brilliant. At least, it is, if you can get the bits.

This one is thanks to Heather and Dave of Mile 73. It has dowelling pushed into 3-way PVC joints.
I thought we (well, my husband, of course) could easily put something like this together, and it would be lightweight and portable.
The only downside was that the kind of three-way plastic joints they use only seem to be available in the US for some reason. Again, if there had been time, I could have ordered them from the US on the internet, they were certainly cheap enough. Why do they not sell them in the UK? You can get all sorts of other connectors, just not the three ways right angled ones.
All we managed to get were t-shaped plumbing joints (copper). So the creative designer / builder had to cobble something together using some curved pieces of plastic plumbing tubes pushed into the t joints to give the third dimension, as well as the straight pieces to form the top bar and the A-frame ends. Of course, none of them were the right size, so it ended up all stuck together with duct tape. And we had to string together the legs so they didn’t splay too much. I’m not recommending anyone does what we had to do, not if you can get hold of proper three way connectors and tubing that will fit inside the connectors. (Or have the time and skill to make one of the others.) When time is so short, sometimes you just have to bodge!
But most importantly, it worked! And it survived being dismantled, taken away on holiday, used while away, dismantled and brought home again. The baby it was designed for now has more or less outgrown it, but there is another grand-daughter almost ready for it!

The whole point about this simple design is that you can ring the changes by attaching other toys. The baby's mummy brought on holiday with them a couple of favourite toys, the blue octopus from her own baby gym at home, and some plastic chain links. You can see those on a later picture. However, I was quite pleased with the makeshift toys we
threw together just before and while on holiday, so there were some awaiting her arrival. You can see some of them here.

The dangly plastic thing is a rattle with some tubes which I had found in a
charity shop, well-sanitized, though I think it would be easy to make something similar.
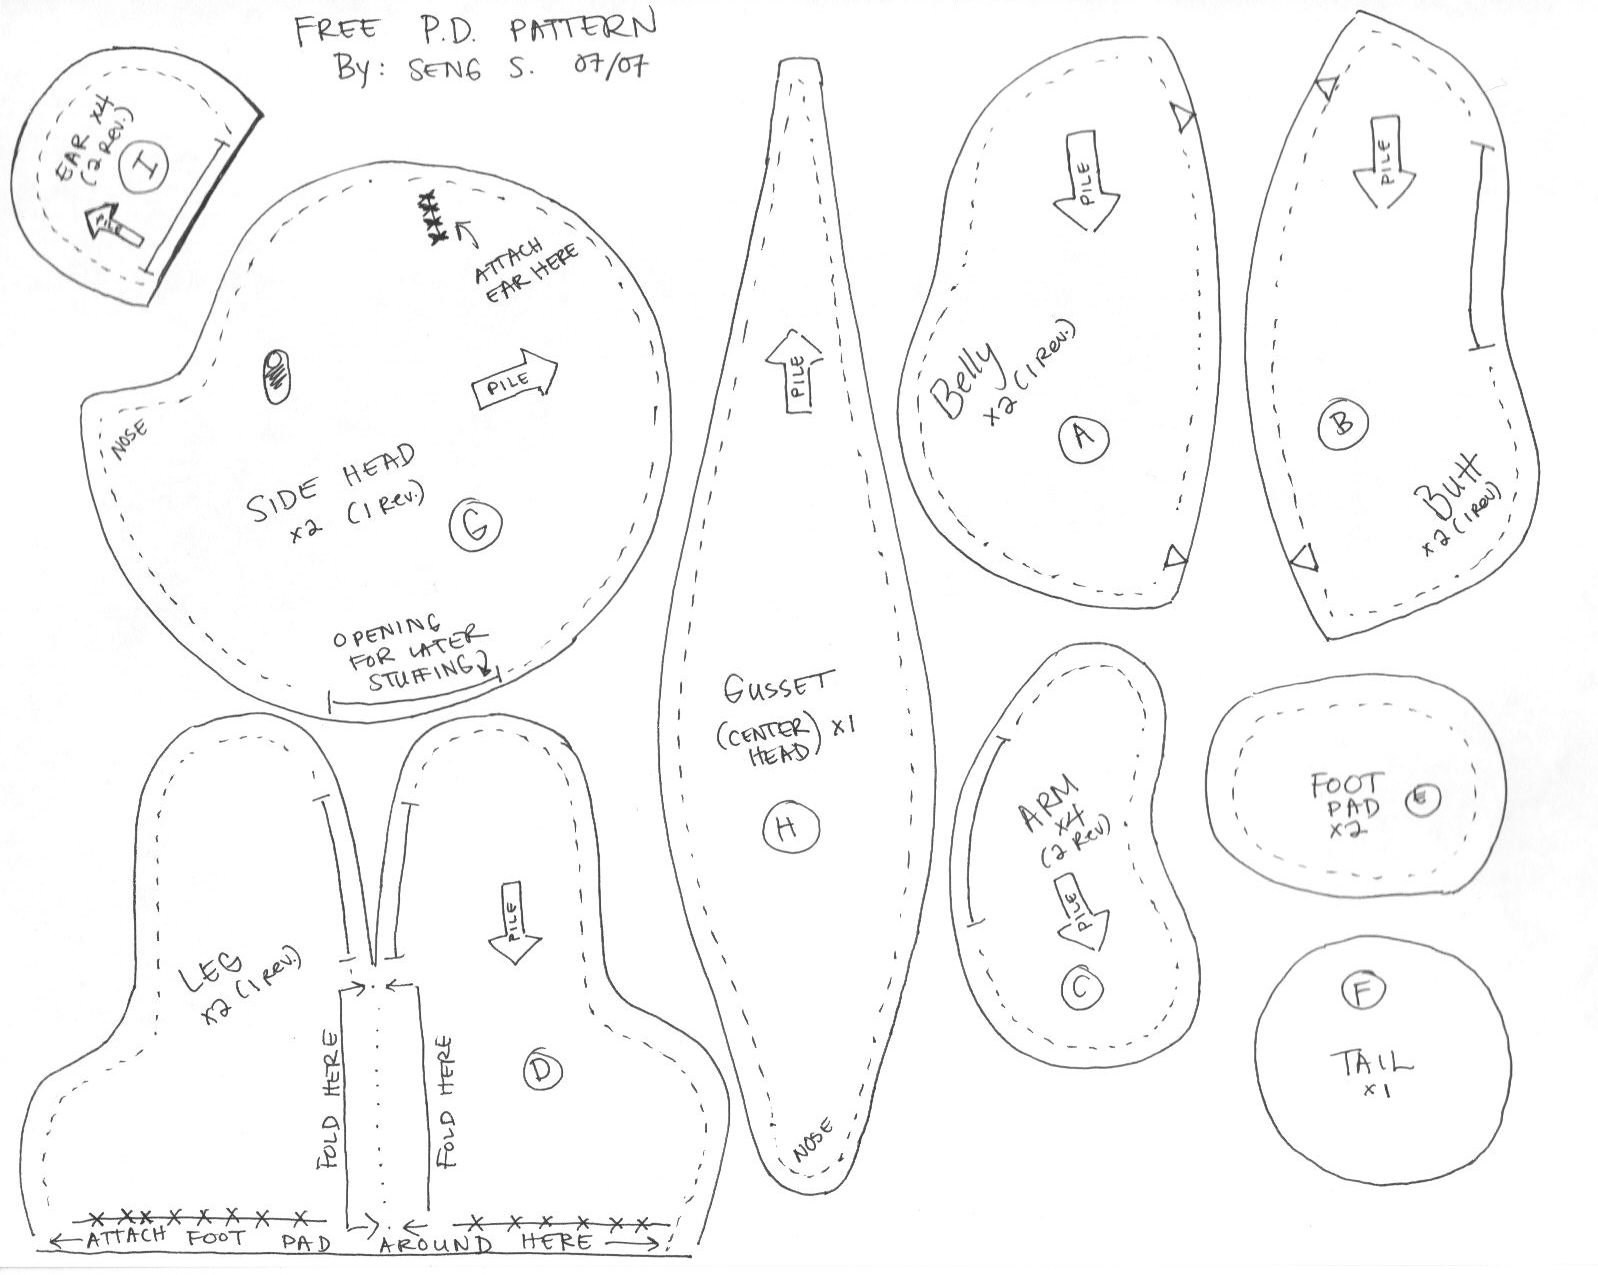
The decapitated bear head and the snake were all my own work. I had a random bit of white fur left over. The
bear head was a free pattern off the internet. I chose it as one of the least scary. (Some bears look quite fearsome.) It has a bell inside. You may know that if you just
put a bell inside in the middle of all the stuffing, you just get a muffled
scratchy clunk instead of a nice ding-a-ling.

So I used a trick I’d read on the internet and put the bell
inside a kinder egg before wrapping the stuffing around the egg, and pushing it all inside the bear's head before sewing up the neck seam. That way, it does give
a more satisfactory rattly noise as the bell moves against the kinder egg.
I
got a few comments about what the baby might think of a bear head with no body.
Would she be traumatised? Well, she didn’t seem to care. It was just something
else to swipe.
The biggest success with the baby was the snake. So I’ll
describe how I made it.

I started with a piece
of material probably about a foot long by about 3-4” wide. I made that into a
tube and turned it out to the right side. I attached a piece of 1cm wide (or half
inch) elastic firmly to one end, somewhat shorter than the tube. I put a safety pin in the free end so I
wouldn’t lose it, and poked it down through the tube. I then stuffed the tube (around
the elastic) with cellophane or some crinkly stuff (that was vaguely damp proof
– I thought this could get sucked and I was right). I then pulled the elastic
right down to the end of the tube, and as it was shorter than the tube, this
had the effect of making the tube pucker up and twist in a snake-like fashion.
This was a bit of trial and error to decide how long to make the elastic. I
then joined the free end of the elastic (the one with the safety pin in) to the other end of the tube so it
would stay puckered and twisted.
The head was made with a scrap of contrasting fabric, onto
which I appliquéd and embroidered two
black eyes and eyelashes. (You could attach little beads or animal eyes but
you’d have to attach them REALLY firmly so they wouldn’t come off. I thought the embroidery route was safer.)
Inside it, I put a squeaker. (These are less than 50p.) This more or less
defined the shape of the head, because I wanted the squeaker nozzle to point
down the snake’s nose.
The baby loved this toy. It crinkled, it squeaked, it swung
wildly when batted. And the head and tail bits were very suckable.

So overall our makeshift gym did its job, just as we hoped.
With more time, we’d do it differently, but we had a happy baby.
It works perfectly with my washable playmat, which also rolls up! Click on the iamge to find the post.

It works perfectly with my washable playmat, which also rolls up! Click on the iamge to find the post.
No comments:
Post a Comment