Tips for making
clothes to grow with baby
I was brought up to think in terms of clothes that were
designed for growth. My mother had lived through clothes
rationing and shortages, and her approach to life rubbed off on me. I think
it’s quite sad to make children’s and babies’ clothes, which you’ve put work
and love into, only to have them outgrown in weeks. By the time they’ve been through the wash and
made their way back to the drawers or cupboards, they may only get a few wearings.
So here are some of the ways I try to extend the life of
little garments. I have made dresses, dungarees, onesies (babygros), rompers, trousers - and all with the idea of allowing the baby to wear them for longer. Below, I describe many techniques which could be useful. Although some of these may be obvious if you are used to
making baby clothes, one of them, the extendable dungaree bib, is my own invention, so you may not have
seen it before!


So for some ideas about how to make clothes last longer, read on!
Firstly - elastic waists
Often a pattern will suggest you insert elastic through a gathered waistband on trousers or skirts of, let's say, 16" for 6 months, 18" for age 2, and 21" for age 5 etc. Then, typically the pattern will suggest you overlap by 1/2" to 1 ". I almost always put in a longer piece of elastic where practical, perhaps an inch or so more, and make the overlap 1 1/2" to 2". I stitch with a zigzag stitch so it will still stretch over the overlapped part. Then, when it's getting a little too cosy round the waist, you can unpick the band where the join is, unpick the overlap, and extend by an inch.
You'll find other ideas on extending widthwise below. But first, I want to tell you my invention for extending length.
Extendable top for dungarees, romper suits, and pinafore dresses

The salopettes have a bib front (it would work with a bib
back in addition, but I just made a bib front). The bib top will come almost up to Baby I’s throat, this year. By next
year, it will probably be someway down her chest. The bib itself doesn’t
necessarily have to be any longer next year, but it will come lower down on her longer torso, so the straps will need to be longer. So here’s
what I did. (This would work for any dungaree-style garment, or pinafore dress etc., that has the
straps made separately from the body of the garment.)
I think I invented this method myself, at least, I haven’t seen it anywhere else, and I made it up as I went along. I used this in the salopettes that I made for my grand-daughter, late in the winter, in the hope that they might also work next winter. This year, she was a small one-year-old (in 6-9 month clothes, now just starting to fit some 9-12 month clothes). Next year, she’ll be 2, and will probably want clothes for 18-24 months.
The bib straps as seen from the front
You end up with a Y-shaped or T-shaped support. There are two straps:
one goes from the front right of the bib, around the neck, and back down to the
front left. Or vice versa. The point is that it is permanently attached to the bib only at one end.
The second strap attaches to the centre back, with its other end free. It folds over the front strap and back on itself. You could attach it to one side of the centre back, giving instead an X-shaped support, but then you might need to angle it. Attaching to the centre back is easier because you will normally have a centre back seam on the trousers or skirt.

The second strap attaches to the centre back, with its other end free. It folds over the front strap and back on itself. You could attach it to one side of the centre back, giving instead an X-shaped support, but then you might need to angle it. Attaching to the centre back is easier because you will normally have a centre back seam on the trousers or skirt.

The bib straps as seen from the back
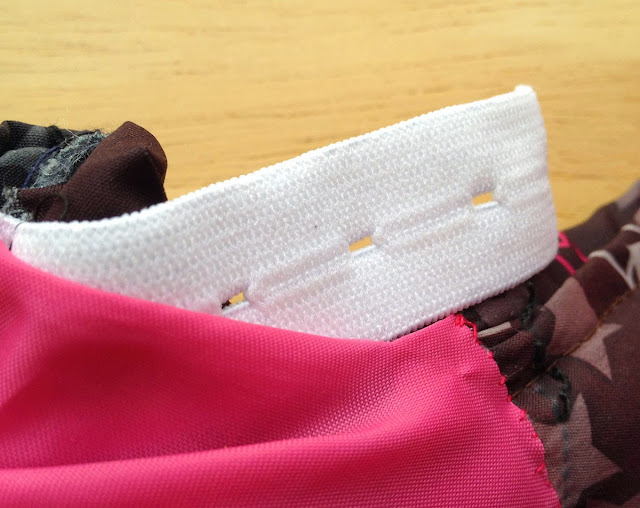
The first strap (attached to the front) has Velcro on the
outside of the free end, and there is Velcro inside the bib where it will attach. I didn’t allow for any adjustment on the front strap, as I figured
it would still go round baby’s neck as she grew a bit bigger. But you could, by
making the piece of Velcro on the strap longer. However, as more of the strap
is exposed, the Velcro will show, if you do that.
The second strap is designed to double back on itself, so it
has a long strip of Velcro on the inside of the free end of the strap. The other piece of Velcro is also on the inside of the
strap, just about where it joins the top of the trousers, or you can, as I did,
put the second piece of Velcro inside the waistband of the trousers facing
inwards.
Once the neck strap is fastened, the back strap goes up and
over the neck strap, and fastens on to itself or to the waistband. It may pull
a bit out of shape, but that’s fine.
If you prefer, you can have a bit of a bib at the back as
well as the front, and attach the back strap to this instead of to the
waistband.
When the child is small, the back strap will pull right down
to one end of the Velcro and the spare bit will tuck down inside the trousers.
Depending on how long you make the strap and the Velcro on the back strap, as
the baby grows, so the strap will extend. Mine is theoretically designed so
that it will never be less than doubled over, but you could do it so that the
free end doesn’t reach the waistband when the baby has grown much bigger. In the first of the pictures above, it is shorter than it ended up. Too short, in fact to allow for the extended growth I was aiming for, having made it initially without my model present.
You can see more pictures of this in this post.
Deep hems
On a little dress, I always try to leave a hem of at least
2-3” (5-7cm).

This hem above is about 2" with a further 1/2" turned under, and then, for speed, I machine stitched it. You can see that I have applied the motif (which I only thought of doing, after doing the hem) above the hem so that I could let the hem down.
The circumference of baby dresses is so small, I often hand sew, which makes unpicking easy, but if I do a machined hem, I use the longest stitch the machine will do. The donkey dress below has a total hem depth of about 2 1/2" : 1" pressed under, and a further 1 1/2", and it was hand-stitched. On this one, I wanted some applique work to go right down the the bottom of the dress hem, so I had to do this before turning up the hem. The bottom of the three flowers to the right of the donkey, and the flower stalks, would intrude on the hem area.

I don’t have boys to make things for, but the same idea of deep hems would apply to a shirt or top for a boy as well.
Tie shoulder straps
I'm fond of these. Instead of making a fixed length shoulder strap, make it in two halves, each one long enough that you can tie them together in a bow: here on a dress....

....and here on a romper suit:

Trouser turn-ups
I love to have a turn-up on trousers, especially reversible
ones. You can start with a deep turn-up, even a double turn-up (i.e. turn up
the hem twice), then the turn-up gets smaller and smaller as those little legs
grow, until there is no longer a turn-up – and maybe the trouser legs even get to be ankle length or 3/4 length, rather than full length.

Elasticated trouser
waistbands
These have two advantages. One is the obvious, that they
expand as the waist measurement expands. The other is that (with loose-fitting
styles) you can roll the tops over when the trousers are still very roomy for
the baby, which makes them shorter, and closer-fitting, so they don’t slide off
so easily. (Babies’ waists are bigger than their hips, so there is this
tendency for low-slung pants, and possibly even descending nappies, especially once they start crawling or toddling.)

Elasticated tops /
bodices
Peasant style tops can last longer than fitted tops, as long
as there is sufficient material in them in the first place. However, they work best with thinnish material, not too stiff, because the neck-line is
elasticated, and so are the armholes. Rather than hunting for the pattern size
for the baby as she is now, it may be worth considering the next size up. Then
put elastic in to draw up the neckline and arm-holes, and put a good hem on the bottom of the dress.
Allow enough elastic. I tend not to cut off the excess but leave it attached,
so I can ease a bit more ‘give’ into the neckline or armholes later on if needed, by
unpicking and re-sewing. If they are wide enough, then it doesn’t matter if
the dress gets a bit short –it can be a top with tights or leggings instead of a
full length dress.

Shirred tops can look lovely, and again, allow you to build
in quite a bit of sideways expansion. I had such a lovely dress for my own
daughter when she was little, I was determined to master shirring on my sewing
machine.


(Just noticed that my maternity dress also has a shirred bodice!) This toddler dress was a purchased dress (I don't think I could aspire to the lovely embroidery) but it is the style that I think looks so cute (and the toddler. of course!)
My first attempts at shirring didn't go well. I ended up with it so tight, it wouldn't expand to go over the baby's head. However, once I went back to my old sewing machine (Frister and Rossman) it worked fine.
Other ways of
allowing for widthways expansion
On a pair of dungarees, or trousers, or a pinafore dress, you
can have a side opening feature, and make the underneath part of the plackets a
lot wider than normal, so you could have two sets of buttons / poppers. Think
of how some maternity skirts work, with mock pockets at the side which are
actually expansion devices. Another alternative is to use button elastic and buttons so
the waistband can be let out. I did this on the salopettes. (There is a more detailed explanation of how to do this, here.)

Flexible designs
There are a number of lovely patterns whose design is such
that the same dress can fit different sizes. For example, the smashedpeasandcarrots pinafore. Below is baby I in my version of it. I hope it may fit her as a shorter garment next year too. If not, we now have a third grand-daughter!


There are several (paid-for) patterns that are called 'Grow With Me'. However, the majority of these just add double cuffs / ankle cuffs / bands, which start folded up and then can be let down. This is similar to the 'trouser turn up' idea above. This can be done on many garments without needing a separate pattern for it. If you are using a ribbing type of cuff, you can just double the length of the cuff pattern. Or with a woven pattern, like these pyjamas, you can make a turn-up with a button tab to hold it up at the shorter length to start with.

Alterations for growth
Most babies grow a lot more length-wise (height) than they do width-wise. To allow just a small ‘give’ at the waist, you can make use of elastication when you make it, or create a side placket, with buttons, with two or more sets of buttons to allow for different sizes, as suggested earlier. That may get you a few more weeks of wear!
Perhaps the garment is already too small. There will eventually come a point when the only hope is for another smaller baby to come along! Once the neckline and armholes are too tight (or the thigh circumference) it may be that you give up the fight. There may be things you could do, but are they really worth it? It may be time for a trip to donate to the charity shop.
However, if the garment still fits in some directions (and there is no immediate prospect of another possible wearer coming along), you can maybe consider:

Or you may be able to cut off sleeves, make the arm holes bigger, and put bias tape round them, and call the once-upon-a-time dress ‘a vest’. Or re-cut the armholes and add new sleeves. I've just done that with my donkey dress, now the hem in the pictures earlier can do no more, and the chest is too tight. I've re-cut it lower down where it is wider, leaving the hem (and the donkey) intact. I made some larger sleeves from leftover material.


Or you could unpick the side seams of a favourite dress or top, hem them (or face with bias binding) and add some buttoned tabs, so you have an over-pinafore.
Here's a further trick, from the Down to Hearth Canadian web site (NB no longer operational, sadly).
Basically it chops two onesies to make a new longer one. Since the web site no longer exists, you might have to do some experimenting to get the length right.


More recently, I needed to lengthen just the sleeves of a top handed down from one graddaughter to another, and with only scraps left of the fabrics used, I had to improvise a bit!
Perhaps the garment is already too small. There will eventually come a point when the only hope is for another smaller baby to come along! Once the neckline and armholes are too tight (or the thigh circumference) it may be that you give up the fight. There may be things you could do, but are they really worth it? It may be time for a trip to donate to the charity shop.
However, if the garment still fits in some directions (and there is no immediate prospect of another possible wearer coming along), you can maybe consider:
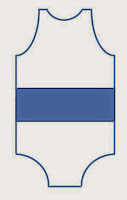
- adding in contrasting panels
- adding length by joining on a frill to the hem
- adding a contrasting waistband with extra material to lengthen the bodice
Or you may be able to cut off sleeves, make the arm holes bigger, and put bias tape round them, and call the once-upon-a-time dress ‘a vest’. Or re-cut the armholes and add new sleeves. I've just done that with my donkey dress, now the hem in the pictures earlier can do no more, and the chest is too tight. I've re-cut it lower down where it is wider, leaving the hem (and the donkey) intact. I made some larger sleeves from leftover material.

Original - as dress
Remade - as top

The new top worn with a matching skirt
Or you could unpick the side seams of a favourite dress or top, hem them (or face with bias binding) and add some buttoned tabs, so you have an over-pinafore.
Here's a further trick, from the Down to Hearth Canadian web site (NB no longer operational, sadly).
Basically it chops two onesies to make a new longer one. Since the web site no longer exists, you might have to do some experimenting to get the length right.

(Picture from defunct Down to Hearth web site)

More recently I came across this post from Zoe with some other good ideas for extending the life of baby clothes.
Finally, if all else fails. maybe you unpick the whole thing, and use parts of it as embellishment on another garment! Or maybe another little person needs it by now.
No comments:
Post a Comment