From this you can deduce that I am not currently making these for hospital use. Our hospitals have not yet put out a general / national request for home-made masks, although locally and on a smaller scale this is starting to happen. The Facebook Group Scrub Hub is bringing together groups around the country starting to make scrubs, and some of these groups are also making masks and other items. I am also in a local group, Sewing 4 Kingston, in Kingston / Surbiton in Surrey, making different versions for key workers - these use a different set of patterns for masks.
To read my review of face mask patterns and tutorials for home use, read on. It's a long post, so if you want a quick answer, read the first paragraph then skip to the end.
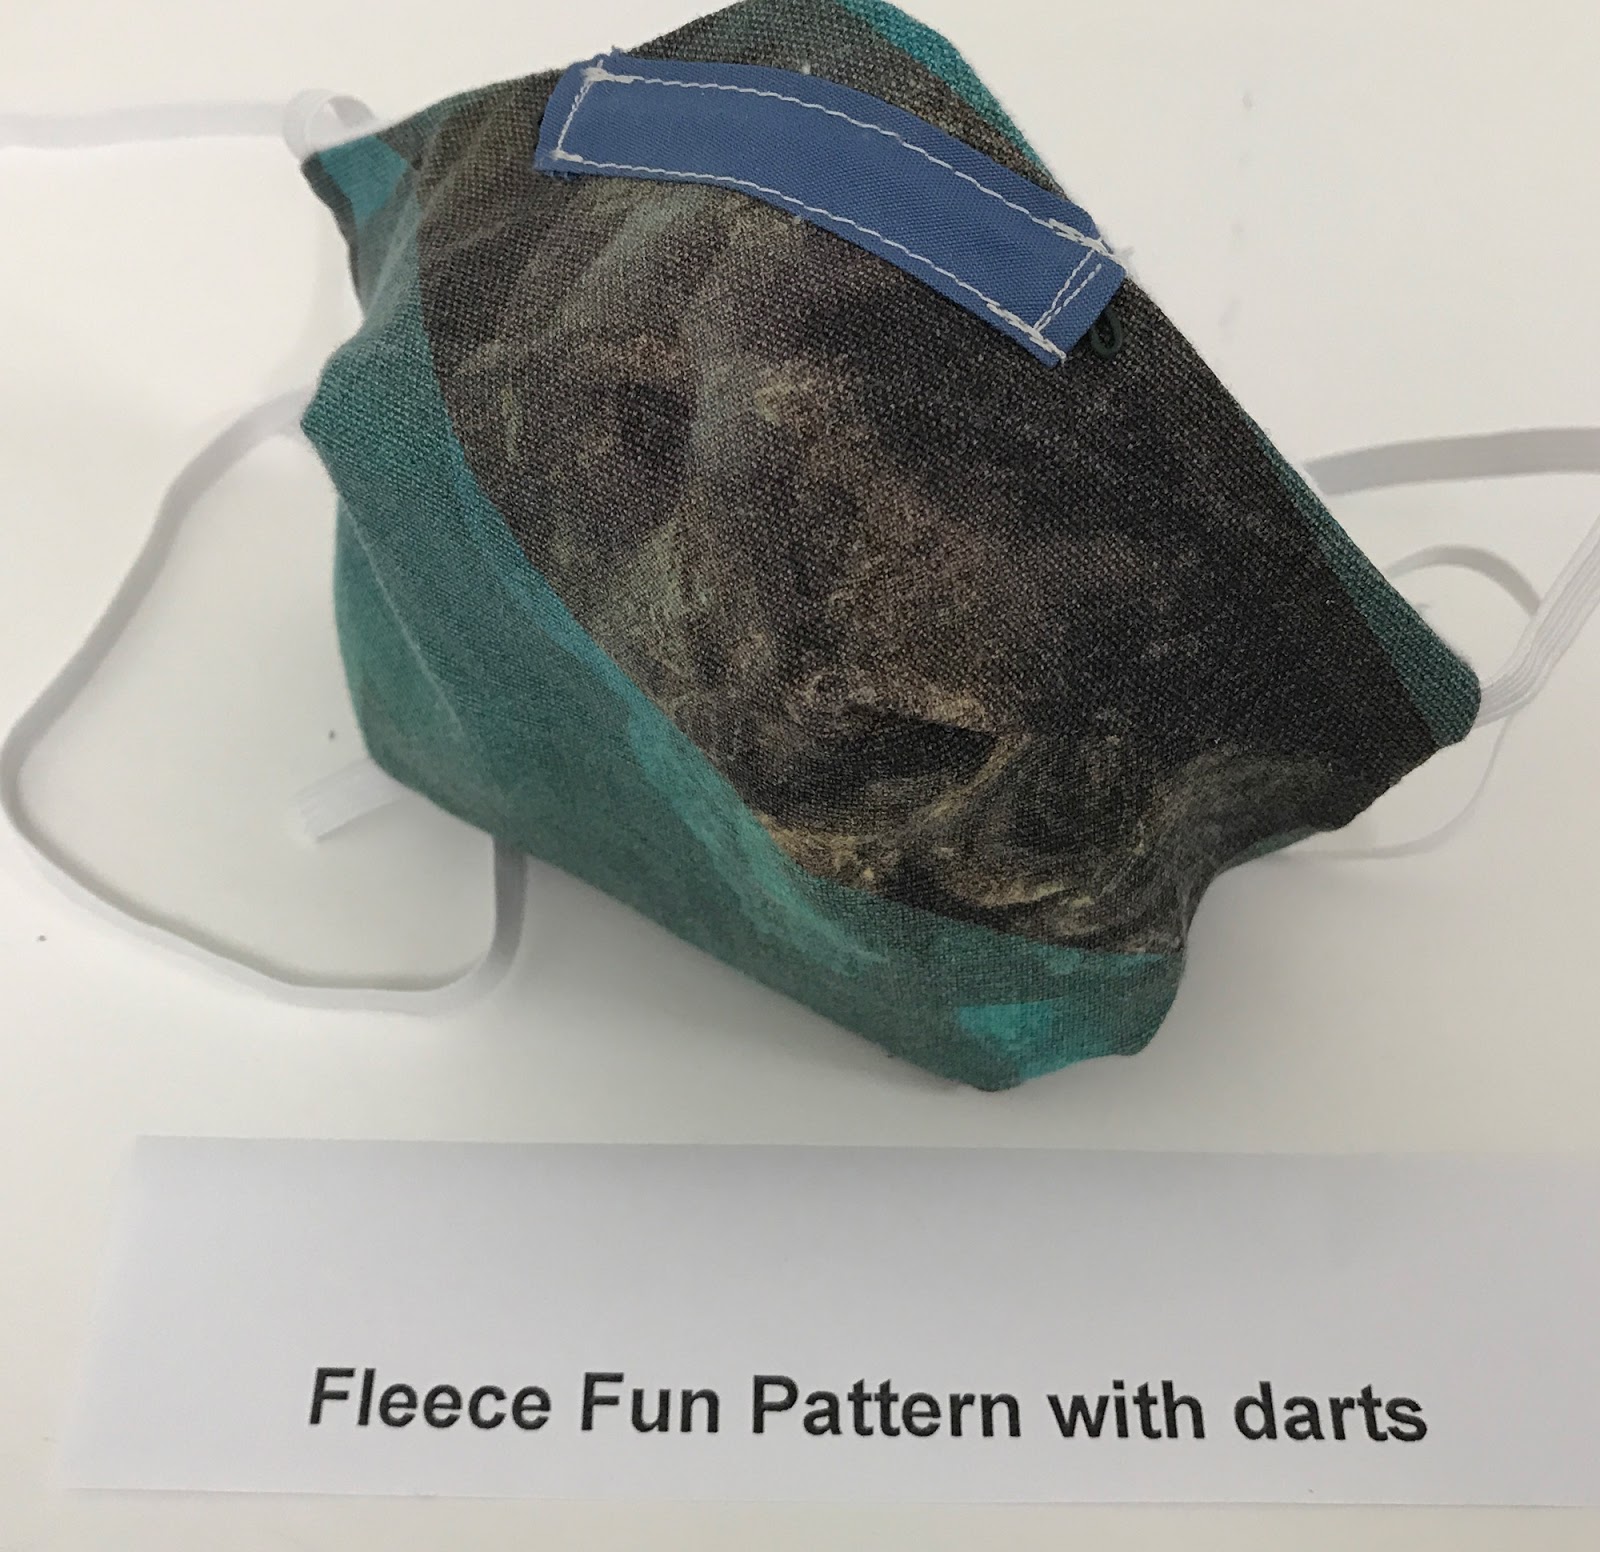
Overall, I concluded that there was one particular mask which worked best for our purposes for all my family testers. Unfortunately, not what I hoped, because it had proved to take the longest time to make. And that was the pattern from Fleece Fun. All the people who tried this one thought it was the best fit (i.e. fitted closely around their face) and was also very comfortable to wear. So as I go on to make more masks, that is the pattern I will use in most cases. (Grrr!) You'll hear more about this pattern later.

To start with I'll assume you know a little about sewing, but for less experienced sewers, here's just a general explanation on making a mask. Almost all of them are sewn right sides together, leaving a hole to turn them through to the right side out. Like this:

For some, the ties are attached into the corners while the mask is still the wrong way out, so when turned the right way out, they are on the 4 corners.

For others, once they are turned the right way out, the ends are folded in to form a channel for elastic or for whatever ties will be used.

There are two main styles of mask, seen in the two pictures above: the pleated, or accordion type and the - yes, it's been called the bra-cup type. There are some variations around each of these, but most masks fall into one of these two types, so I am going to group them in that way. For each, there are alternative approaches to attaching them to your face, whether to insert a nose wire, and whether to include a pocket for an additional filter layer. So I'll talk about these variations separately in another post.
I made up 6 trial masks for the purposes of this review. Some of them used the best (or possibly worst) features of more than one pattern of each type, but I wanted to test several ideas without making dozens and dozens of masks, many of which would be similar.
In order to compare the patterns I made, all of them bar one were in the largest size (if there were alternatives sizes), in most cases called Adult Male; and used the same materials for each (irrespective of what was suggested). All of my prototypes had an outer layer of what in the UK we call tea towel fabric, (tightly woven fabric of linen or thick cotton, using for drying washing up that has been done by hand - these may be called dish cloths in the USA) and an inner layer of flannelette or brushed cotton. I used these because some research had showed that these had pretty good filtration - though were not necessarily very breathable. We'll come onto fabric choices later.
The Pleated Mask
These get their shaping from a number of horizontal pleats which open in the centre over the mouth and nose. The majority are made from one or two rectangles of fabric, to form an outer layer and an inner layer. There are advantages in using 2 separate pieces, even though it means an extra seam. Firstly, it makes it easier to tell which is the inside and the outside - very important, and especially demanded in a medical environment. And secondly, if you have a fabric with a directional design, folding it horizontally will put the pattern upside down on one side - maybe you won't care about that for a face mask. I used the two different fabrics mentioned earlier for all of mine, even if the design I was using suggested just one piece, folded in half.
The first trial mask I made of this style used the Dana Made It mask design and tutorial. (#1)
I found this one very easy to make - Dana always has very clear instructions. She uses two pieces of fabric 9" x 8" (23cm x 20cm) for an adult large, and either 2 pieces of elastic 13" (33cm) long or 4 ties of 18" long (knit or bias strip.) The idea I liked best here was the possibility to use ties, especially when elastic may be in short supply. Dana shows how to cut strips of knit fabric with good stretch, about an inch or so wide. This has an inclination to curl up anyway, especially when you don't want it to, but for these purposes, pulling the ends of the strip makes it curl up even more, and you have some ready made ties without the need for seaming or hemming. She attaches them into the corners with the mask inside out. A good and simple design, and I inserted a nose wire into the top seam. This definitely improved the fit. At this stage I hadn't thought about having a pocket for a filter - more about that later. She also provides cutting sizes for 3 smaller versions of the mask. So for a pretty quick and easy make, I can recommend Dana's mask. She also provides a video if you prefer to work from a video tutorial.
The first You Tube is from Interquilten. This is a pleated style with a pocket and vertical ties at the ends, and with an optional wire. It uses an outer 9x9”, an inner 9x8”, 2 yards bias tape or ties, 3” piece of wire encased and top stitched into a section at the top, and has an opening at the top between two sewn down lines 5/8” from top and 2.5” long. Having not done so, I realised it is easier to do all of the opening side, including inserting the wire, before sewing bottom seam. She gives no specific size for the 3 pleats, which are encased in long vertical ties. Personally, I'm less keen on the idea of vertical ties. However, I believe the medical profession prefer this, as they tie the top tie over the top of their heads. It is a nice clear tutorial.

For my second trial mask, #2, I used the Interquilten video plus the following one from Making It Easy With Liz. I wanted to try having a separate channel for elastic sewn over the raw ends of the pleats, as I thought this might be less bulky than sewing the pleats when the mask was still right sides together and turning them out. Like this:

In the end, I don't think it made a lot of difference. Like the Interquilten one, this has a vertically assymetric pocket, but is pleated with end strips to bind the pleats. She puts elastic through the ends and knots round the ears. (On this one, I looped the elastic all the way through so my testers could decide whether they preferred the round the ears or round the head type of attachment.) Liz uses 1 piece 15” x 7.5” , with end binders of 4” x 2-2.5”, and this was the second pleated one I made. However, I split this into 2 pieces of fabric, adding a small seam allowance, as I wanted to use a different fabric inside. I also inserted a wire. Liz suggests a 7” wire turned in at ends. She also says that a piece of 3” x 8.5” cardstock can help in making the pleats, and I used this idea to get my pleats down to 3".
Sewing Seeds of Love.
Like the previous ones, this has a vertically asymmetric pocket, with a wider opening than the above, but with the opening at the bottom rather than the top, as is the case for the others above. It can be made with ear elastics or corner ties, she gives both methods. She uses 1 piece of fabric 8” x16”. She turns the hems to form the pockets (along the 8" sides) first, then sews the ends together at 1.5” from the outside edge. Then she put pins on the sides at 5”,4”, 3.5”, 2.5”, 2”, 1” for pleating. She suggests using e.g. baby wipe filter. I did try this, but it went into a hole when I washed it ever so gently, to remove the chemicals. You can choose 4 x 20” ties (non stretch), or 2 x 7” elastic round ears. The fastenings are sewn into the corners before turning the mask the right way out. The main thing I did like about this tutorial is that she also shows alternatively how to use 2 x 4” elastic ties at each end, in a sliding fisherman’s knot so the ear pieces are adjustable. I thought this was a good idea if you are going to have ear elastics. She adds her wire at the end, making a pocket in the top to slide it into. I thought this might be a bit fiddly to push it through that way after the rest was sewn up.
Another similar tutorial is from The Sewing Channel.
In terms of pleated masks, let me also mention Victoria Pero's tutorial. Although in most respects her design is pretty much the same as most other pleated style masks, she adds one feature that I think might be useful - a small dart in the bottom seam, to create a closer fit round the chin. Victoria uses 2 rectangles 6” x 9”, and 7” elastic (later amended to 8”), encased through sides before turning out, and a 6” wire.
I used this final pleated style mask for #3. Like the Victoria Pero model, the Do It Better Yourself (DIBY) mask looks to improve the shape of the pleated mask by adding darts in the centre - this time one each at the top and the bottom. The top is also slanted up towards the middle (top of the nose). I made the bottom dart slightly longer, as otherwise it was almost all going to disappear into the seam allowance. The pattern is marked at the sides to guide the pleating.

In the end, I couldn't make the marked pleats work - they were too small - so I just made pleats as I had done for the other two pleated masks. I should say that I also did the darts on the outer layer and inner layer separately as I didn't want raw edges on the inside.

For this mask, I used some stretch bias binding I already had for the ties. I thought this might make for more comfort. However, I think the non-stretch ties suggested in the pattern would have been better, I couldn't really get the mask tight enough. In spite of the chin dart, I found this (in the second largest size) rather baggy round the chin, as you can see in the picture - maybe an even bigger dart would help.

I added a wire to the nose, and left a pocket for a filter.
However, I'll now make one general observation about having a filter pocket in a pleated style mask, where the two layers are pleated together and sewn at the ends: it is actually quite difficult to get a filter in. To get the filter in means unfolding the pleats, as the two layers are folded together. (There are some masks that fold the pleats separately, but most don't.) I've tried to illustrate this, but you'll have to excuse my terrible drawing skills!

The Bra Cup Mask
Yes, sorry to call it that, but everyone who looks at them says - that looks just like a .... And there are even some ribald jokes around. I won't repeat them. Here's an example:

I made this one, #4, from a pattern by Craft Passion. This was one of the earliest ones I made. So I hadn't put a wire in it - it would have been a better fit with a wire. My tester found it a bit tight over his nose (he told me he has 'a big conk', but it looks a perfectly normal size to me.) It might be better for him for it to be made with a deeper curve. He seemed happy, though with the elastic ear loops. I find these uncomfortable, and, as I have quite small ears, it won't stay on very well. So for myself, I would probably use the second method of attaching elastic that is covered. The pattern has been around for a few years (more recently revised to include a pocket, nose wire etc.) There are currently over a thousand comments, growing daily, on the web site, suggesting it is very well used. Some of these found the mask a bit small, which my tester did, as well, but it is very well written, easy to make, and so much so that it may well be worth experimenting with. I think this - with some modifications - may be my first go to after I give up on the Fleece Fun pattern.
It's a simple shape, seamed down the middle. The inner and the outer are seamed separately, and then sewn right sides together, leaving a small gap to turn it the right side out. There is an alternative pattern for one with a pocket, but I made the one without. Here are the pattern pieces cut out, 2 of the inner, or lining, and 2 of the outer.

The outer has a wider side piece to fold in to form the channel for elastic.
There are also many other bra cup patterns on You Tube and elsewhere that I will mention.
There's another from Made on our Homestead which is like the Craft Passion one, but a slightly different shape – you need to mark the top. On this one, only the top and bottom are sewn RST. then after turning out, she folds in the ends to form channel. No wire. 15” elastic round ears to allow for adjustment. Pattern is here.
You may also find the one from Work from Home Dad: (I initially found this confusing, as it's a woman who gives the tutorial - I think she is Work from Home Dad's wife.) The Mimi G mask can be downloaded. It is something like the craft passion one, but also gives the measurements of 7.25” top height, 4.5” at the lower part, 4.5” deep for the liner, plus the extension of 1.4” for the front outer so it makes a central pocket. Craft Passion instructions are clearer. However, the Work From Home Dad pattern is moving in style towards the Olson Mask, about which I will say a lot more.
The Olson mask has a central pocket for a filter. The pocket may be formed by a narrower inside layer (like the Craft Passion pocket version); or by having separate 'Mouth' and 'Cheek' pieces that are made to overlap (a bit like a pillowcase opening). The ones made for US hospitals are being made without fastenings, but with a wrap over part which will encase elastic bands provided in the hospital, held with safety pins, and without wires, as those will be provided too, as will a filter. Here's an example that I made.

There are so many videos on this, and some are frankly awful. Sometimes the pattern being used in the video is not the one provided. Or the one provided only comes in one size, not the several the video suggests. Or you can't actually see what they are doing. Or the audio is terrible. I will mention some of these, as they are all over the place now, but the first one is the best 'how to' in my view. It's by Be Alice. This shows how to make an Olsen mask for hospital use – a very easy to follow tutorial.
Here are some others. Feel free to watch them, but you may come back to the Be Alice one. Many are making masks for hospitals in the US, or even if they are not, are aiming to get an equivalent filtration. So there are lots of comments and arguments about what to use, and some of the suggestions are, frankly, dangerous. I'm not going to get into those arguments. You make up your own mind using common sense. I've given you only the better ones.
Instructables.
This is a (sensible) web site rather than a You Tube, and it has patterns in small medium and large, with two pieces for each. This one has three layers in total, outer, lining and a narrower inner which forms the pocket, rather than the cheek piece and mouth piece. It's a clear and well-written tutorial with lots of pictures. I can't say whether the materials suggested are appropriate or not, especially for the filter. Some of them are not available in my country. Personally I wouldn't use a knit fabric for the main body of the mask, I believe closely woven cotton to be better, but that's up to you. I also didn't try this actual pattern, but it's certainly worth a try. I may have a go at it some time.
Unity Point
I saw a reference that this web site is supposed to be keeping the pattern versions up to date, and it certainly has a downloadable pattern for a mask of the mouth and cheek parts style. But only one size. It also has a terrible video on You Tube with poor sounds and, and which many commentators said they found too confusing. (Instead, I recommend the Be Alice You Tube mentioned earlier, or this one from Lorrie Lunemaker. Her pattern is a free download from her shop but you probably have to register to get it. I didn't, as I felt I had plenty of patterns!)
The Sewing Channel. There are a number of different masks on the Sewing Channel (a pleated version is mentioned above) but it also has this bra cup / Olson style pattern. The pattern itself doesn't appear to have any special advantages, but the main thing she does differently in the video is to put a piece of foam in with the wire to make a tighter seal. You may like this idea. It has shorter cheek piece than some of the Olsen patterns. The video in general seems a little bit muddled to me and it has a hard to find the pattern (you have to click ‘more’ in the description to be able to see it). Otherwise seems similar to many others above.
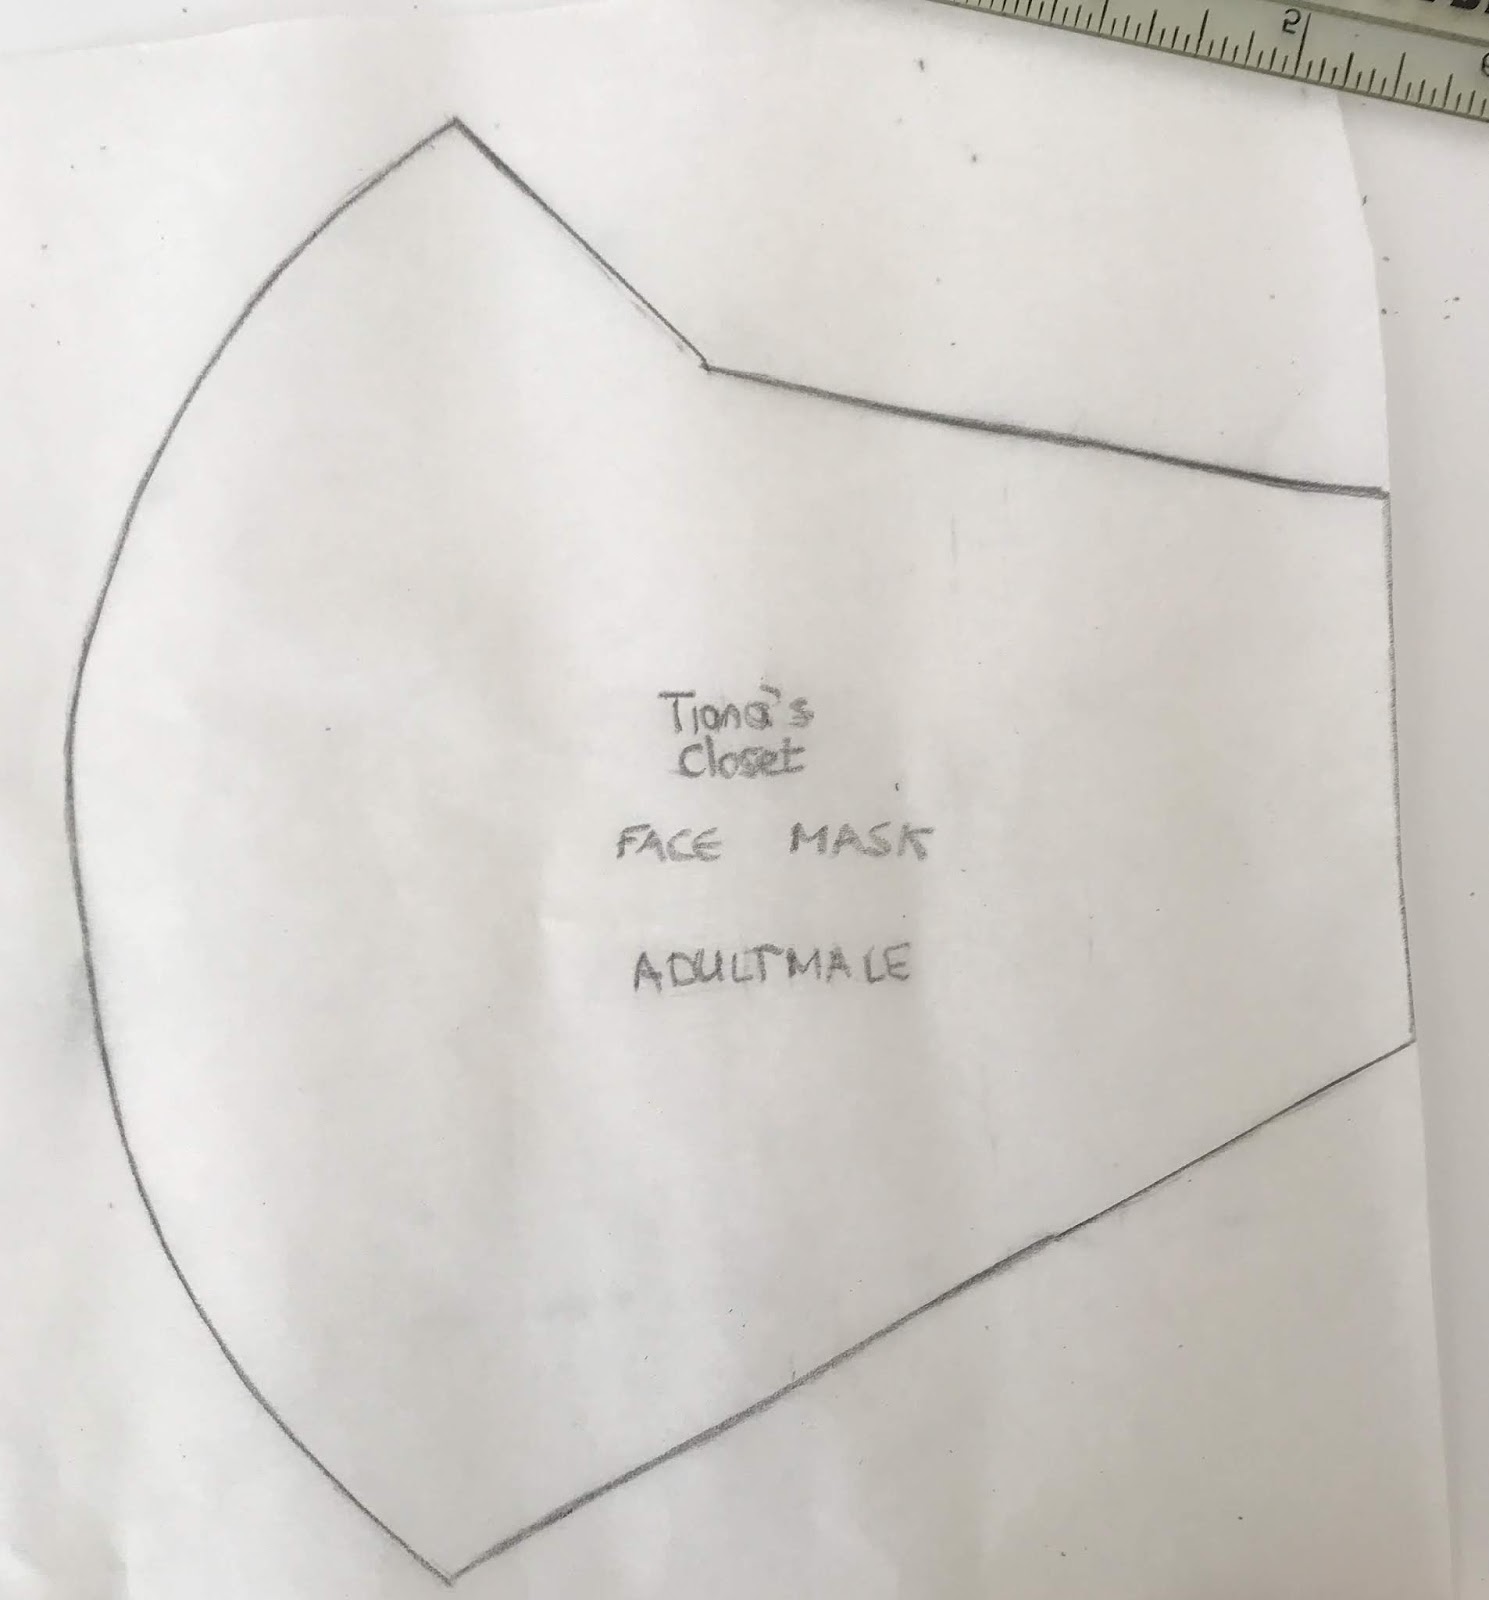
So, you are asking, did I make an Olson mask? Well, yes, kind of. So on to #5. I also wanted to try out the shape of another pattern I had found, which differs from the Craft Passion one in having a more 'shaped' bit over the nose. This is the Tiana's Closet pattern. My tracing of the Adult Male size shown.

And here's how I split the Tiana's Closet pattern to provide the two overlapping pieces for the pillowcase type of pocket.

All my pieces cut out.

Pieces overlapped to make the pocket.


Front and back pieces clipped together RST ready to sew together, and turned right side out through the pocket.
Front view

Back view with ends ready to be sewn (I wasn't making for hospitals, so I wanted a finished mask that could be used immediately.)

I also wanted to try a different method of attachment (the one from the HomeMade on Our Homestead pleated mask mentioned above, but using a long strip of knitted fabirc allowed to roll, in lieu of washing line). Oh, and I put a wire in it, though the Tiana's Closet tutorial doesn't suggest that.)

So how was it? Well, sadly, it seemed too big! I liked the fact that it was not only more rounded than the Craft Passion one, but had the nose shaping. But it will only work for us if I use a smaller size.
So, on to my final attempt (to date) - #6. And this what you've all been waiting for - the winner! I received this pattern through my email subscription to Fleece Fun. Having made it, I so didn't want it to win, because I'd found it the hardest to make. I think if you had an automatic pattern cutter, like a Cricut machine, or even if you were competent with a rotary cutter, which I'm not, the preparation would have been easier. But there are still 6 darts to sew per layer, so even if you dispense, as I did, with two inner layers, and just have one, you have 18 darts per mask. The big idea of this mask compared with other cup shaped ones, is that you can avoid a centre seam - a possible vulnerability of a mask.
But - ALL of the testers said it fitted beautifully, and was really comfortable, with enough room around the nose to make breathing and talking comfortable - and yet it fitted closely to the face. There are only two sizes, adult and chlid, so everyone tried the single adult size. Having tried that, they ALL said that was the one they wanted, even when I sounded pathetic and said - but it's the hardest one!
So I may ask for some help at least on the cutting out.

And here's my attempt to start cutting it out.

Sewn right sides together and clipped ready to turn out.

Showing the channel for the nose wire - I thought with this lower down the mask it might not give as good a seal, but yes, they all loved it! However, my daughter suggested we use a longer nose wire so it can go along the face more. I will do a minimum of 4 inches or 10cm in future.
Like this: -^-
Like this: -^-
One happy tester

So, to summarise:
I was looking for the best re-usable / washable mask for me to make for our purposes. "Our purposes" means non-medical use, for example, visiting the supermarket or other places where social distancing is difficult. We feel in these curcumstances, masks may help in reducing transmission, not that they are mainly to protect against the virus - though we hope they may reduce risk. We do not expect to be wearing masks for extended periods. So for different purposes, other masks may be better. We simply wanted something that would help us, our family and friends, leaving the 'proper' stuff for those who really need it, like medical staff, care workers and other essential workers.
The "Winner", for our purposes, was the Fleece Fun pattern and tutorial. But it was also the most difficult to make of the 6 tested. Given that I want to provide everyone with at least two, it's going to be a challenge! My daughter has now said it would be better with a longer nose wire, so it doesn't just go over the nose but also along the cheeks a bit, to help avoid glasses steaming up.
Others that could be useful include the Craft Passion one, perhaps with some modification to make it more roomy. I would also use the 'round the head' elastic rather than round the ear. And I would add a nose wire.
Or, for a quick and simple to make version, if you prefer the pleated style, then the Made by Dana tutorial is as clear as any. You could put a little dart at the bottom if you wanted, though I don't think that make a lot of difference. Again, I would add a nose wire. So I may knock out a few of these quickly, while presevering with my winning mask.
FOOTNOTE: I had a request from my brother's extended family to make them some masks, as they had a rather more urgent need, I found a way of knocking out a few quickly using a new pattern that I hadn't previously tested, but it worked prefectly for them. I modified the original design by Billette's Baubles to have separate pieces of elastic on each corner, rather than fixed length ear loops. which I think is more limiting. I made the elastic strings long enough they could go round the ears or round the head, as they chose. This pattern was easy, and easier to pleat than some, because although the centre has three layers, there are only two layers to be pleated. I've done a separate post on this. It's a good pattern for fast makes.
What I am still not sure whether I will bother with, is whether to include a pocket for a filter on masks for our use. I'll explore that in more detail in the next post, coming soon. In this follow-up post, I'll talk about some of the features of masks in more detail, for example, nose wires, pockets or no pockets, and different materials.
So good luck with your mask making - and wish me well, too, as I will have quite a few to make.
No comments:
Post a Comment