I'm always interested in new shorts patterns, as my four granddaughters like wearing them a lot. So I was very pleased to see Life Sew Savory's Bermuda Shorts, a free PDF and tutorial. I like Emily's patterns, and she generously shares a number of free patterns, which I have generally found successful.
The Bermuda shorts would work well for boys as well as our active little grand-daughters. They have pockets (tick!) and a faux drawstring, as well as an elasticated back waist for comfort. Here's my trial pair, in woven cotton (made from fat quarters).

To read the full reivew of the pattern, including how I slighlty altered / improved mine, read on.
First the quick summary: I like the finished result from the pattern, I'll definitely use it again, but I will make a few modifications.
First, the sizing. It comes in 5 sizes: 4/5, 6, 7/8, 10/12, and 14/16. Emily does point out that her own daughter is of a slim build. My grand-daughters are also pretty slim, though the one I made these shorts for is also quite muscular (she has a good set of gluts!) But the two oldest are also very tall for their age, so I almost always size up. With the Bermuda shorts pattern, I sized up to the size 7/8, for a tall 6 year old, AND added some length. But they only just fit right now, and her Mum says I could even have gone up to the size 10 /12 and they wouldn't have looked huge. I will make the next pair in size 9/10 - by drawing a new line in between the 7/8 and the 10/12. This should give a bit more room for growth. But I'll keep the elastic round the waist the same size, for her narrower waist. I think the size 7/8 will be fine for my other 6-year-old granddaughter, who is a slimmer build, especially round her hips. But I will still add to the length - probably a couple of inches on the bottom of the legs. None of my granddaughters or their Mums particularly like short shorts, and even though these are more Bermuda than shortie, the pattern as it is would be a bit short in the leg for our needs. Fleur considers these (with the extra 2") a perfect length. I also added an inch to the top, to accommodate her shapely rear. Incidentally, the pattern is designed for woven fabric, but had I used a knit fabric, probably the size 7/8 would have been fine on her.

I won't size up quite so much for the next oldest, at aged 5 1/2, I think the size 6 will be fine. For the 3 year old, I might just reduce the size 4/5 a bit, and not add to the length. Ideally, measure the child and go by the measurements, not the size.
Now to the making up of the pattern, per instructions. I found all the instructions pretty clear, bar a couple, where I needed to email Emily for help. (I have always found her very helpful!)
Here's the first correspondence I had with her, and her reply (in red).
From me: “On the front secure the outer edge of the pocket…..” – I didn’t know what you meant. My shorts didn’t look anything like this at this stage, and I didn’t understand what the flap was in the picture. (I’ve taken a lot of pictures of mine.) So I just basted the outer edge of the pocket to the side seam, and put a couple of stitches in the top, too – there was hardly any overlap at the top, I assumed it would just be 3/8” i.e. seam allowance". I added the picture below.

From Emily: "Yes, there is just a bit of overlap of the pocket and shorts front. The directions were just meant to tell you to stitch at the top...Like you did".
So that helped straighten me out on the one picture that I hadn't found clear in the instructions. In hindsight, I found it a bit fiddly to match the pocket and shorts body up with this small overlap. I think perhaps next time, I might swap the pocket curve (where the hand goes in!) to the pocket, and do the straight seam on the shorts body, to make matching the side seam easier. That will mean the pocket will be added on the outside rather than the inside of the shorts. But that may be personal. I've done other shorts with this applied pocket, and it's often easier to go with what you know. I wrote up more about using an applied pocket, in this post. (It is towards the end of that post, so just scroll down.)
Would take the interfacing down further so the btuton holes have the interfacing too.
I haven’t
decided yet, but I may also make a separate waistband (making the pattern a bit
shorter at the top to accommodate that). But I’ll let you know. I need to know
how these are going to fit before I do another pair.
Thank you again

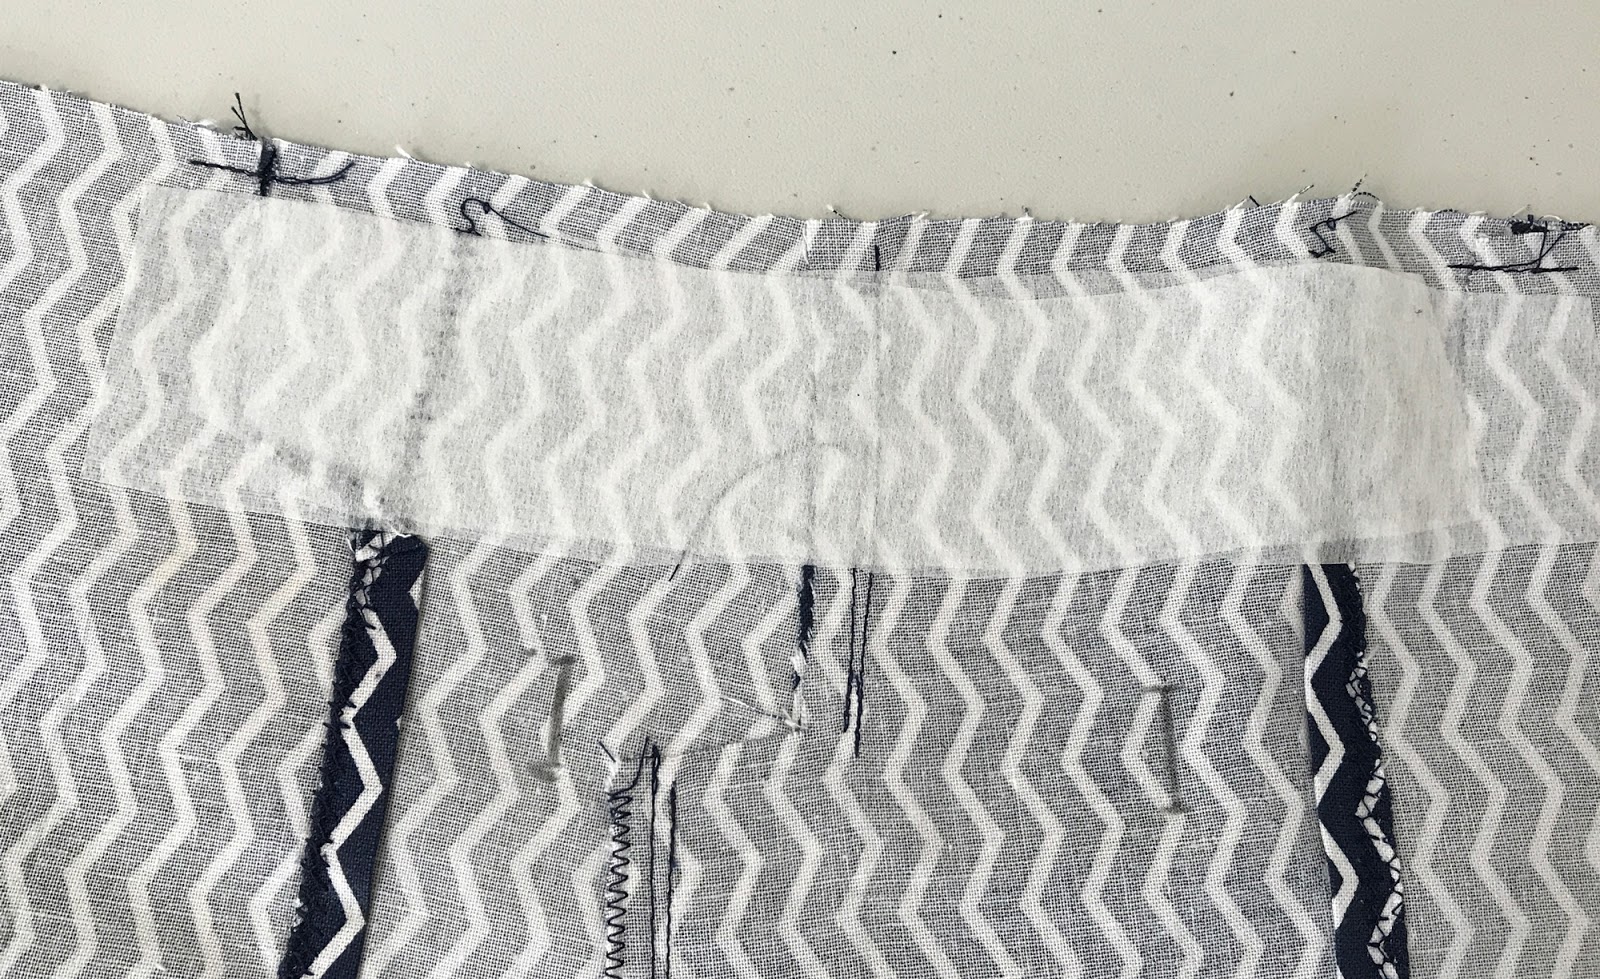
The second query I had was about the interfacing. (For some reason mine wouldn’t stick properly, but
that’s a different issue!) Initially, I followed the instructions implicitly. with the interfacing just across the top where the waistband is. And then I marked the button holes. (Seen here as the little pencil lines either side of the fake fly.)
 And that raised a question for me, which again, I put to Emily.
Me: "The question is, do you not need the interfacing to go down where the button holes are to reinforce them? I did it as your pictures appear to show, with the button holes below, but (I’m glad to say) I tried a button hole first on a scrap of the material, and it went seriously wrong (again, I’ve taken pictures.) So I tried again with a bit of interfacing under it and it was perfect."
The trial button hole on the left had no interfacing, the exact same button hole on the right used interfacing. Seen on the inside.....


Here is Emily's response to that query.
"I used denim so didn't need interfacing over my button holes, but I should change it to say that it would be good to extend your interfacing down if your fabric is a bit thinner."
I'd already done the interfacing so it missed the button holes. So here's the inside of my finished button holes with little bits of interfacing used just round the button holes. Worked fine.

Me: "The question is, do you not need the interfacing to go down where the button holes are to reinforce them? I did it as your pictures appear to show, with the button holes below, but (I’m glad to say) I tried a button hole first on a scrap of the material, and it went seriously wrong (again, I’ve taken pictures.) So I tried again with a bit of interfacing under it and it was perfect."
The trial button hole on the left had no interfacing, the exact same button hole on the right used interfacing. Seen on the inside.....

.... and on the right side of the fabric.

Here is Emily's response to that query.
"I used denim so didn't need interfacing over my button holes, but I should change it to say that it would be good to extend your interfacing down if your fabric is a bit thinner."
I'd already done the interfacing so it missed the button holes. So here's the inside of my finished button holes with little bits of interfacing used just round the button holes. Worked fine.

So I ended up with my button holes on the shorts with scraps of interfacing underneath. But it would be better to continue the waistband interfacing down to the bit where the button holes are. That is what I will do on the next pair, which will be in between the size 6 AND 7/8.
Putting the front and back of the shorts together was no problem, altohugh you can see that where I'd lengthened the shorts by 2", my 2" wasn't very accurate, and there's a slight mismatch between front and back. That was easy enough to recity by njust trimming the back to match the front.

And her response: "I measured the shorts on my daughter and just tightened and then sewed it as I showed. I think it would be too hard to keep it tied tight with just the draw string. The drawstring is really just to be able to tighten it a bit, not to fully keep it up.. Can't wait to see photos!!"
So I did as she suggested, and it worked fine. Overall, I think they look neat. Oh, one other change I made - well, it's not really a change, just a matter of taste. You’ll see I made the overstitching in the same colour navy as the shorts, rather than a contrast, so it stands out less – that's just personal preference.
Putting the front and back of the shorts together was no problem, altohugh you can see that where I'd lengthened the shorts by 2", my 2" wasn't very accurate, and there's a slight mismatch between front and back. That was easy enough to recity by njust trimming the back to match the front.

These legs were wide enough on this size that I was happy to do the shorts hems after all the other seams had been completed. Sometimes, with little tiny legs, I will at least press up the hems before doing the seams, and I sometimes sew them except for the bits closest to the seam.
I had one final query for Emily, which she answered with her usual patience!
Me: "Finally – no picture
yet – I’m not sure whether to secure the elastic at the pocket edges as you’ve
suggested, as this means you wouldn’t be able to tighten it by pulling the
drawstring. What’s your experience with this? I am yet to do that part."And her response: "I measured the shorts on my daughter and just tightened and then sewed it as I showed. I think it would be too hard to keep it tied tight with just the draw string. The drawstring is really just to be able to tighten it a bit, not to fully keep it up.. Can't wait to see photos!!"
So I did as she suggested, and it worked fine. Overall, I think they look neat. Oh, one other change I made - well, it's not really a change, just a matter of taste. You’ll see I made the overstitching in the same colour navy as the shorts, rather than a contrast, so it stands out less – that's just personal preference.
So, overall, another great free pattern from Life Sew Savory!
No comments:
Post a Comment