Here's the result:

You can find out more about how to make these simple zipper cases by reading on.
Both used this same fabric from a fat quarter that I used for my Superheroes Quiet Book page.


Coin Purse
I found several examples of tutorials for making a coin purse on the internet. Probably the clearest and most useful was from Melly Sews. Melissa also does a great video tutorial if you find that easier.
I didn't use her exact measurements, because I wanted to get the Black Widow part of the fabric centred on the finished purse (remember the request for girl superheroes?).

So the size was pretty much defined by the placement of Black Widow on the front. I don't remember the exact measurements, but it would have been a little over 5" deep (or 12 3/4 cm) by about 7" wide (or about 17 3/4 cm). I made the lining out of a small piece of left over denim out of my scraps box. (Fairly soft thin denim, not the thick stiff type.) You can see the wrong side of the lining in the picture below.

I had a zip in a yellow ochre colour which complemented the fabric quite nicely. I wasn't going to be using it for anything else - it had been hanging about in the sewing box for yonks. However, it was about 16 or 18 inches long. No matter - Melly gives a method for shortening a zip. So that was the first thing I did.
Next, I attached both the outer pieces to either side of the zip. (You can find out how to do this on Melly's tutorial, or any of the many other tutorials on making zipper pouches, that explain it far better than I could.) This picture is after the outer pieces have been attached.

Near the bottom of the zip in the above picture you can probably see the self-coloured over-stitching of the zip above the cut end. The over-stitching prevents the zipper opening any further, before you cut off the excess zip.
You may also be able to see in this picture above, that I have made a little strap, it's positioned on top, with the split ring and clip already attached. To make this, I used a spare piece of the fabric about 3" by 5" (7.5 cm by 12.75 cm). I folded it lengthwise, right sides together, and made about a half inch seam down the long open side. I then turned it out using a safety pin, and pressed the seam. Then I doubled it over the split ring. I attached two little alphabet beads with Jane's initials onto the split ring, as well as a clip. I hoped this would not only add as a sort of name tag, but would mean the purse could be clipped onto a belt, or her larger shoe bag. I stitched close to the ring to hold it in place.
After attaching the outer fabric pieces to the zip, I attached the lining pieces in the same way, and then laid the outer fabric pieces and the lining fabric pieces right sides together, as in the picture below. The strap is now between the two outer fabric pieces, with the clip part facing inwards and the raw edges poking out. Before going any further, I opened the zip partway. That is very important - if you fail to do that, you won't be able to turn it the right way out!
Then I sewed all the way round, with the exception of a gap of about 2" or 5 cm on one side, as you can see in the picture. That gap enabled me to turn the purse through, so it was the right side out. However, before I stuffed the lining back inside the outer, I folded in the seam allowance of the gap to the wrong side, and stitched the gap closed on the sewing machine, near the folded in edges. Once it's inside, you don't notice that little bit is sewn up.
And, miraculously, the strap was now on the outside! This shows you the reverse side.

And once again, the side with the Black Widow superhero.
All that remained then was to put a couple of small coins inside and present it to a happy Jane. My grandmother, who would never walk under a ladder, taught me that it is very bad luck to give someone a purse or handbag without putting some money inside. Or perhaps it was bad manners, I don't remember which. But I still do it!
Pencil Case
For this project, I already had a spare royal blue 8" zipper (20 cm), so no need even to shorten a zip first. I didn't have any more denim scraps, but I used some shiny navy taffeta type of material for the lining. For coin purses and pencil cases, I rather like a dark lining as it doesn't show the marks so much!
Originally, I had intended to use exactly the same method to make the pencil case, just changing the dimensions. However, then I found another tutorial from Mairuru which shapes the corners to make a wider shaped bottom to the case, better suited to stuffing with pencils, erasers etc., rather than just a flat case.
I didn't follow the exact measurements from the tutorial, because, again, I wanted to make sure I had the superheroes well-placed on the case. But I did follow the basic approach.
First, instead of starting with a rectangle, you start with a trapezium shape (I think this is called trapezoid in the US).


A-B - 23.5 cm
C-D - 28 cm
A-E - 9 cm (i.e. the perpendicular to C-D)
The seam allowances were 0.5 cm on all sides (on top of the above measurements) but 0.7cm on the top side (where the zip goes).
Before I did anything else, I attached a name initial to one of the outer fabrics - you can add this or any other decoration later if you wish, but I find it easier to do when the pieces are all separate. Here, you can see the initial on the finished case. I put it near the end so it didn't hide too much of the figures.

Once you've attached any decorative features you want, the method starts with the same steps as the coin purse, i.e. attach the outer pieces and inner pieces to the zip. Then you also put the fabrics right sides together and sew all round but for a gap to turn it through. Here's a reminder, showing how it worked on the coin purse, as I didn't take photos of this stage on the pencil case. Again, remember to partially open the zip first, before sewing it all up!
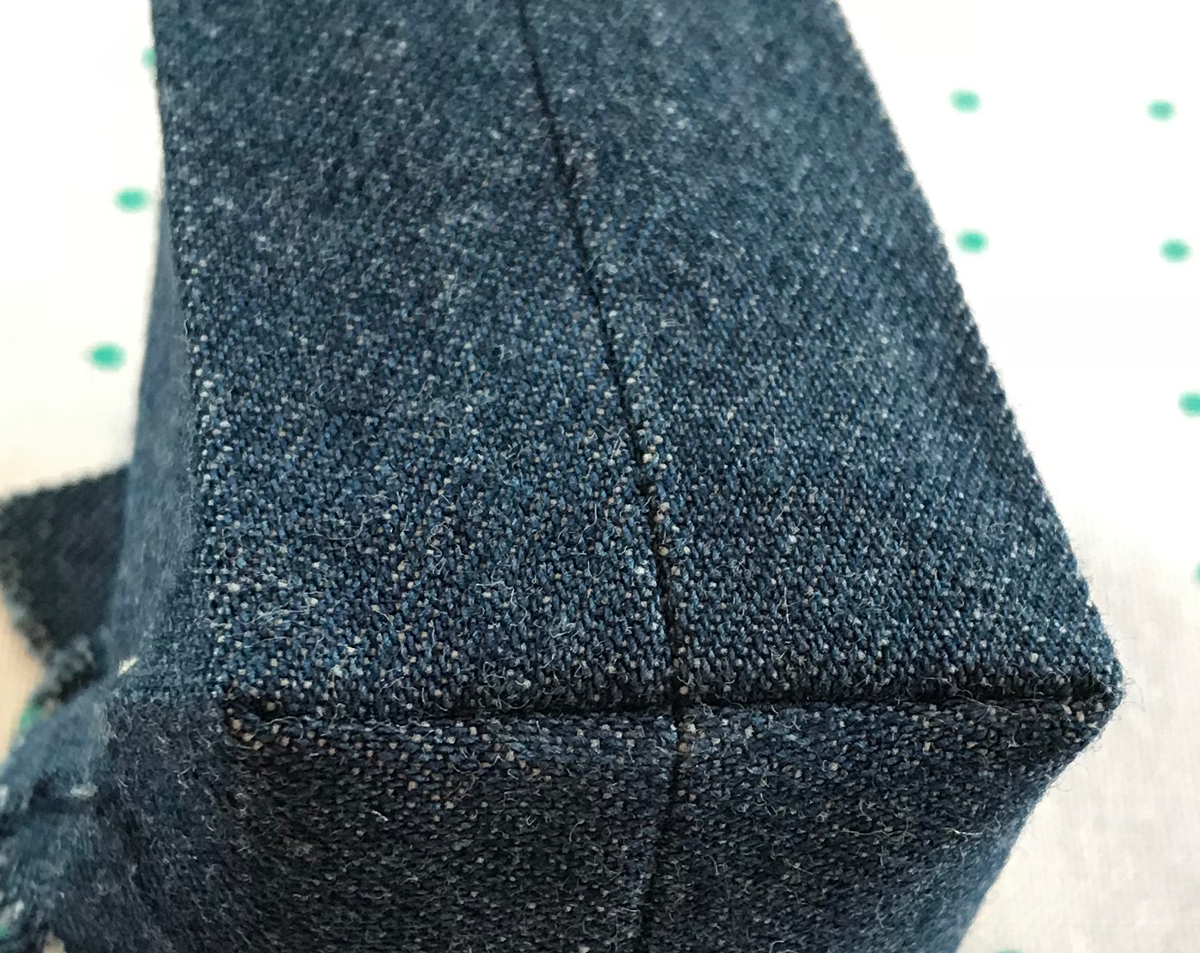
However, for the pencil case, before you turn it back through the gap, you need to square off the corners on both the lining and the outer fabric.
This is probably best explained in pictures. (This isn't the actual pencil case but just some scrap I sewed up afterwards to show you the method.):
1) Take each corner after sewing, and ......

2) Press the seams open

3) Press the corner into a triangle, right sides together, lining up the side and bottom seams, like this:

4) Sew across the corner so you have a seam of about an inch in length. (This depends on how chunky you want to make it - an inch was fine for me.)

5) Trim off the excess material from the point

6) Press out all the corners on both lining and outer fabric - you've then got a nice boxy corner.
Turn it all through. Then push the lining back inside the outer (assuming you've now sewn up the gap through which you turned it the right way out.
The tutorial I referred to says something I couldn't really follow about sewing the ends together before turning it out. However, I just turned mine the right way out and hand-stitched the corners together.
Here you can see the boxy corners at the bottom, on the finished case.

And here are a couple more pictures of the finished case.
If you can't give a coin purse without putting a coin or two in it, then I guess the same goes for a pencil case, with pencils!

No comments:
Post a Comment