Rose loves unicorns and rainbows type of fabric, so it was clear that I'd be using this fabric she had chosen for her Christmas dress this year. But we need sleeves for our Christmas dresses, and so few patterns have sleeves, especially long sleeves. Then I found P4P's free Tiny Tulip T shirt, which has a long sleeve option. I thought that would be pretty easy to convert into a dress with a couple of layers in the skirt. She loves it, and has worn it at every available opportunity since (until she got her new birthday dress - but she still loves this one).

To find out how I got on with the pattern, and for the links to it, read on.
This was Christmas Day, The dress was straight on, and didn't come off till bedtime.
So, to recap: I started with the free Patterns for Pirates (P4P) Tiny Tulip T shirt pattern. To get the pattern for free, you need to sign up to the P4P Facebook page, but that's no hardship, as the group is full of good ideas and tips, and you also have access to other free and paid-for patterns.
It's called a Tulip, because you can have either the back, or the front, as a wrapover tulip style. Or neither, as in my case. So it is a very versatile pattern, and I've no doubt I'll use it again, perhaps just as a top. It comes in sizes 3 months to 14 years - so it should serve grand-daughters well. I used the size 6 for Rose, just coming up to her 5th birthday, because she and her sister (and their Mum) like clothes to be comfy and loose-fitting, with room for growth. So it was perhaps a larger fit on her than many people might choose, but she and Mum thought it was absolutely perfect.

To make the top, I used the solid back and the solid front, rather than the wrap over pieces. Because I was using a knit fabric, there was no problem with getting it over her head. If you tried to do this with woven fabric, you might need a short zip in the top at the back.
As you may be able to see i the picture above, I lined the bodice (not the sleeves) with a thin stretchy T shirt material in a darker kingfisher blue. This was partly to give the dress some substance (I thought the weight of the skirt might drag the bodice down) but also for warmth in our cool climate. I also dislike doing neck bindings, but that was a minor point - I'll do them when I need to.
Full instructions for the bodice part, without a lining, are given on the P4P pattern.

Where what I did differs is in adding the lining to the bodice. This, of course, meant I didn't need a neck binding. So first, I sewed up the shoulder seams on both the bodice and the lining. Then I sewed the two necklines right sides together, and clipped the curves.

Then I turned the lining back to the inside and pressed all the seams. (At some stage, I top stitched the neckline, but I may not have done it at this point as I wanted to keep things loose while I attached the sleeves.) These are both the shoulder seams on the lining and the bodice, joined at the neckline. You'll note I didn't bother to 'finish' the seams, as tthe raw edges were all going to be encased inside the lining.

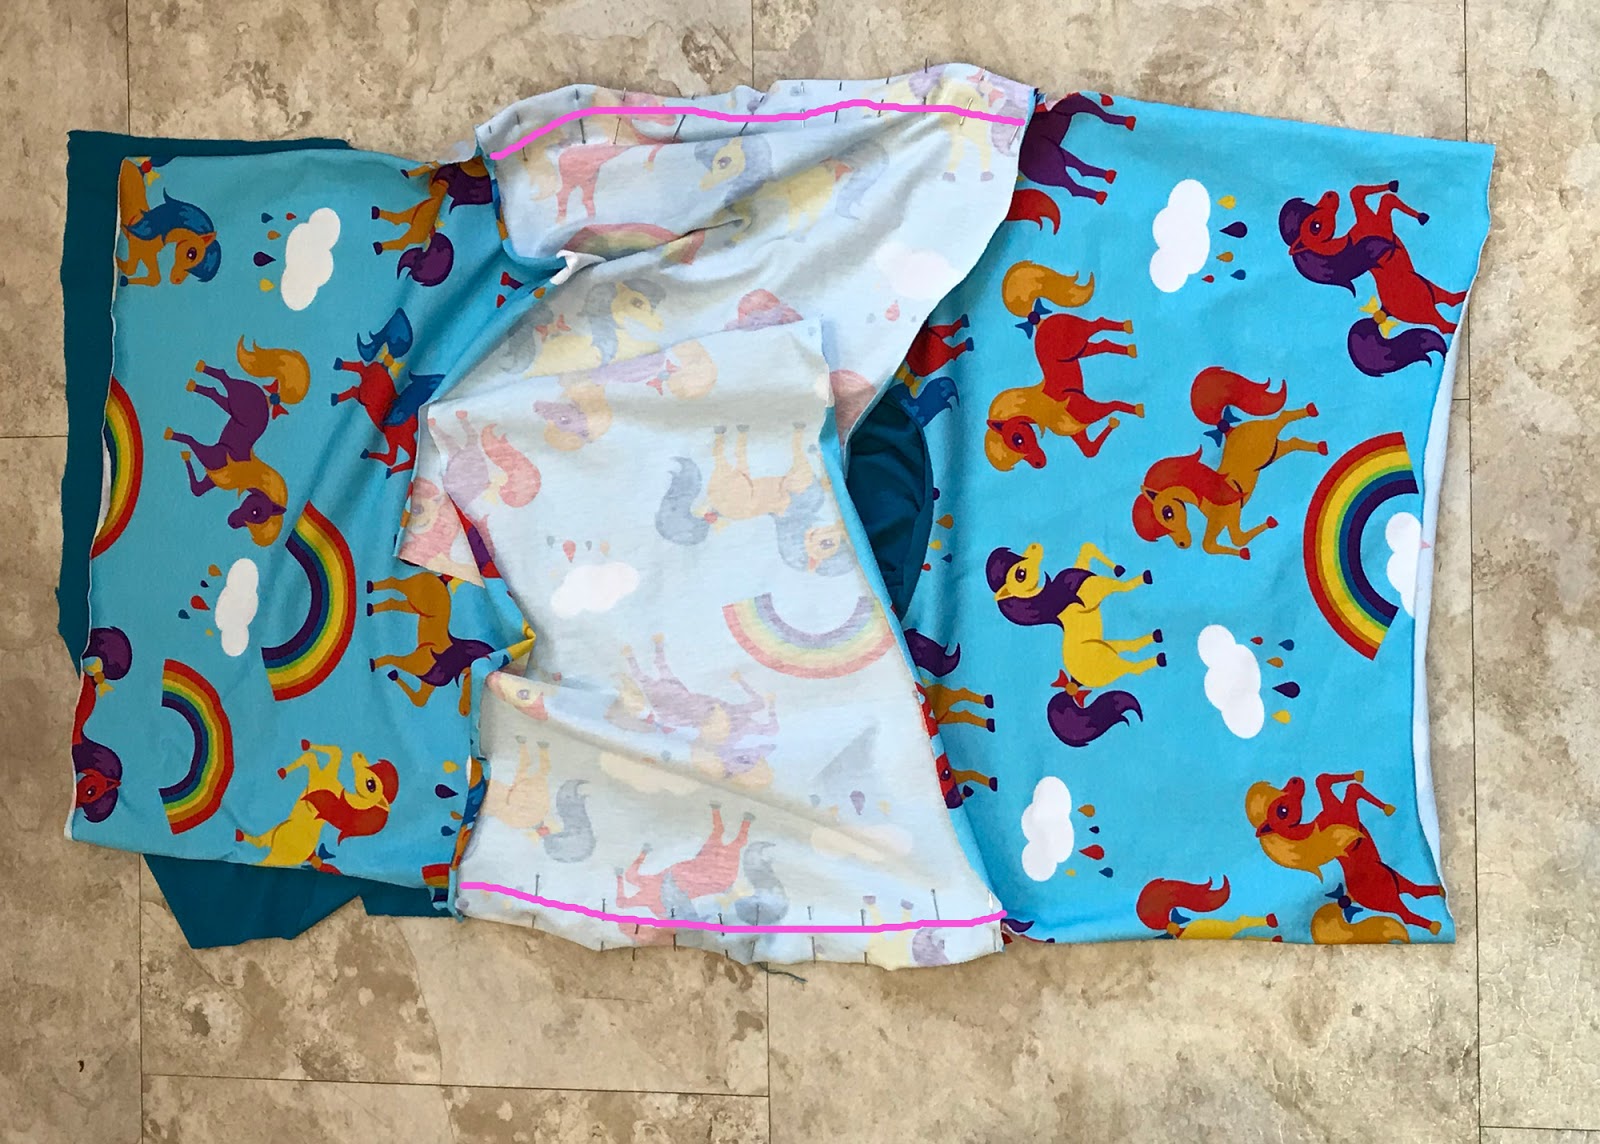
Next, I pinned the two long lower sleeve parts to the armholes. A bit hard to see on this picture, perhaps, but I've put in the lines where they will be sewn on. Some people (with a serger) might prefer to add the lower sleeves to both layers i.e. bodice and lining, but I prefer to encase the seams insdie the lining, so I kept the lining fabric out of the way while attaching the sleeves.

No more pictures, I'm afraid - I just got very enthusiastic about finishing the dress! I then sewed up the side seams of the lining, and did the side seams of the bodice and sleeves, as one continuous seam from waist to cuff (or vice versa). I hemmed the sleeves using a double needle, and slipped stitched by hand the lining armholes to the bodice armholes. (I clipped round the lining edges just short of the seam line to make thenm easier to turn in.) And I top-stitched round the armholes.
Once the bodice was complete (but before stitching the bottom of the lining to the outer bodice) I made the skirt. There were two layers of about 6.5"-7" deep (when finished). The top layer (Layer 1) was 1.5 times as wide as the bottom of the bodice. The bottom layer, Layer 2, was then a further 1.5 times the width of Layer 1. I made the layers into 2 circles, then I machine hemmed the bottom of layer 2, and gathered the top of that layer to fit the bottom of layer 1. Once sewn on, I topstitched to hold the gathers neatly in place (pressing the seam upwards). Then I gathered the top of layer 1, pulling it up to fit the bottom of the bodice. And top-stitched that, too, catching in the folded up bottom edge of the bodice lining.


I'm happy to say that this dress has been a great success. It was worn several times over the Christmas holiday (into the washing machine, then out and straight on again) and I noticed she was also wearing it for her fifth birthday party 4 weeks later. So I can safely say this pattern will definitely now be in my repertoire, both for the way I've used it here, as a knit dress, and as a top with a wrapover front or back. Three cheers for P4P, I say!
No comments:
Post a Comment