I'd been looking at ways of using up some of the multiple colours of fleece scraps in my stash, and just in time, along came Emily Thompson of Life Sew Savory's with her great Sweatshirt Tunic pattern. I'd had an idea for some time of doing something like a rainbow because I had so many colours, and hence the sunburst was born. I think the Life Sew Savory pattern works really well.

You can find out how to make it here (or anything with a sunburst design).
To make the sunburst design, you first start with a blank piece of paper. (Don't worry, this is easy. Just a bit of origami needed!) Mine was a sheet of A1 drawing paper, but you could use a piece of broadsheet newspaper or wrapping paper. (For a baby or toddler, you could use a smaller sheet of paper.)
First fold it in half to make a crease, and then draw a line down the crease.

Next, fold one of the top corners down to meet the centre line you just drew. Unfold it and mark that crease as well.

Do the same with the opposite (top) corner.

You could stop your folding there if you just wanted 4 panels, but I'll assume you want 8. So, keeping folding! Next, you'll fold the top left corner down to the diagonal line - not to the corner, but just so that top edge lies along the diagonal crease. And unfold it and mark that line.

Take the same corner over to the other, farther diagonal. And repeat both these folds with the other side. Here's the final fold, where the corner is taken across to the farther diagonal.

You've now got all your folds marked, and all that's left is to add a semi-circle. (You don't have to do that, but a) it looks nice, and b) it would be extremely fiddly to join the 8 points that all converge.) One way to do this is to use a compass (the thing you had at school with a point and a pencil), putting the point in the apex where all the points join.
I had what I thought was an easier way. Some time ago, I'd downloaded the Cucicucicoo circular skirt template. Since I did this, I see she now asks you to sign up for her newsletter, but I still think it's worth it, and you can always unsubscribe.) The template consist of lots of concentric quarter circles, the idea being that you can use this template to make circle skirts. Which I have done. One this occasion, though, I wanted to use it to draw my semi-circle. You can see below that I've used the 65cm circumference line. I placed it first on one half of my piece of paper and drew around the curve, then swung it round to the other side to complete the semi-circle.
Of course, you can draw whatever size of semicircle you want. If you are making something very small, I would probably make the semicircle smaller.

Then finally, you can ink in the semicircle and the parts of the lines outside it. If you think you will only use this oce, you can cut up each piece to act as a template, to which you will need to add seam allowance. (I'm assuming you are going to sew something using this, but you could use it for marquetry, or a mural!) However, I could see myself using this over and over, perhaps just varying the size of the semicircle, so I decided I would trace my pattern pieces.

There are all sorts of ways you could use this sunburst design. It would make a great quilt. Or even a bag!

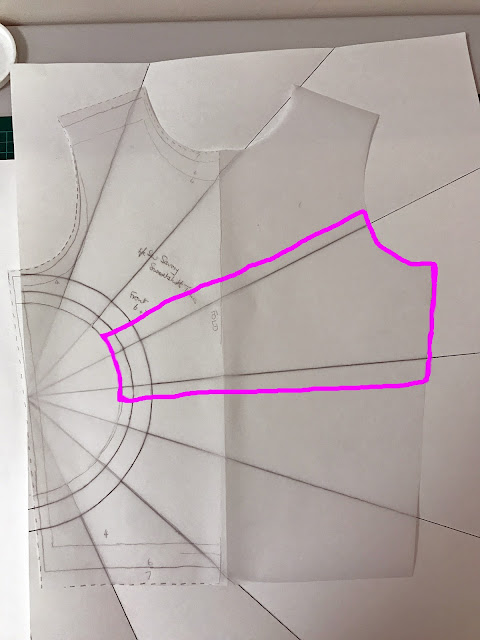
First, I traced the pattern size I wanted to use. I preferred to do that than to use the actual pattern, since I could see through the tracing, and move the pattern piece about until I was happy with how it would look. I shifted it a bit to the left from what you can see in this picture. I could already see that my two pieces on the extreme left, above and below the semicircle, were going to be quite small.


Personally, I think it's neater, though undoubtedly it takes longer. I used the same method for the neck binding, though I didn't take a photo of this step. You can get a glimpse of what it looks like, though, through the keyhole opening in this back view.

I've kept my original folded and marked sunburst template. I think this would also make a great A-line dress, in the summer. But I'm expecting more requests for sunburst Sweatshirt Tunics - my husband has already said he'd like one! A great scrap buster.

I then used more tracing paper to trace out the individual pattern pieces for the segment. You can see I added seam allowance to the lines where the segments would join each other and the semicircle. There was no need to add any additional seam allowance round the armhole and side seam.

I added about 3/8" or 1cm seam allowance to the sides of the segment. I found this wasn't quite enough in the case of the semicircle, to which I added at least 1/2". I'm sure there is a mathematical reason, which is beyond me, but I just found my semi-circle a bit too small once I'd joined all the other pieces together.
So I used my pattern bits (carefully marked with numbers to show where they would go) to cut out the coloured pieces of fleece, and then joined the seams - first the segments, and then the semi-circle. I used a damp cloth to press open the seam allowances. In this picture, I've also joined the shoulders seams, so the back is attached to the front.

In order to allow the semicircle to lie flat, I clipped the curves round the edge. I hope you can just about see that in this picture.

From here on, I pretty much followed the tutorial provided by Life Sew Savory. So I'll only mentioned points where I varied a little.
First of all, I added about and inch in length to the sleeve pattern. I had noticed some people commenting that the sleeves are quite short. They are meant to be. But for winter I thought I'd just make them a little bit longer. Here are the sleeves and side seams clipped ready to be sewn together.

The only other differences were in the way I made the neck bindings and cuffs. I don't have an overlocker (serger), and I also prefer not to have the exposed seams (the grandchildren complain about 'itchy' seams on many of their bought clothes). So I applied the binding, and the cuffs, in much the same way as you'd attach bias binding to the edge of a hem: Sew (a single layer of the binding or cuff) right sides together with the neckline / hem, thus:

I did this before sewing up the side seams and arm seams.

Once the arm seams were completed, I folded the cuffs over, folded under the very edge, and sewed in the ditch to close it up. Here's what the cuff looks like on the outside.

And on the inside.


Thank you again to Emily for yet another amazing pattern. It looks great in this sunburst, but making it without such complex colour-blocking would also be a great make - and much quicker!
I love that you wrote up a tutorial for this idea!! Going to have to try this for sure!!
ReplyDeleteHere's a tip (maybe you've considered this?) put your bottom band seam on the side instead of directly in the back. It can line up with one of the side seams and be less "visible" vs being directly on the back of the shirt like here!
ReplyDelete