My A-line dress has a top back neck opening, that is faced, and meets edge to edge. There are lots of ways you can close it. Here are some alternatives.
Note that only the first can be done at the end of making the dress or bodice, and this is the method used in the A-line dress basic tutorial. Any of the others have to be done while or before attaching any facing or linings.
Button and thread loop
This method can be done as the final step of making a dress or top. In order to sew on a button, though, you need more than layer of fabric to attach it to. So I'll assume you have a facing or neck binding to which a button can be attached.
I like to attach the button/s first, so that I can accurately size the loop. If you have just two layers of thin fabric, (i.e. no interfacing), it's a good idea to sew or press a small piece of interfacing in between the bodice and the interfacing to give the button some support (and perhaps lessen the risk of it ripping off).
I usually make a thread loop with a few strands of thread sized to fit the button, with button hole stitching around the threads. The picture below comes from Ysolda.com, a lovely site with mainly knitting patterns, but she also gives a very clear explanation of this method.
There are two You tube videos that give two alternative methods of creating the loop. One is the one I've described briefly above, the several strands oversewn by button hole stitch. The second is this chain stitch version. This doesn't have commentary, but it is clear what is being done, except that I don't see her check that size against the button before finishing the stitching. However, it is a neat and easy way to make a loop button hole. Plus Melly Sews also has a clear explanation, here.......
Here's one I made in chain stitch using cord elastic.
Button and elastic loop
I have some nice variegated rainbow-coloured cord elastic that I often use to make button loops. Here, I've taken a fuchsia pink piece of it to make a loop on this dress. In this case, I did sew the loop on before attaching the button, as it needs to be encased between the facing and the bodice. (You could attach it afterwards, but it's not as neat.) I'd intended it to be on the other side, but I got it wrong!
Sewing over the elastic to hold it in place can be tricky, so I usually first hand-sew a few stitches through and round the elastic to hold it in place, before using the machine. You can find out how I suggest attaching loops into the facing, below.
Button and fabric loop
These next three pictures all have sewn fabric loops with buttons. In general, these work best with larger buttons, and can only really be done with a fairly thin fabric. In fact, I used the lining fabric to make the loops in all three cases, rather than the main fabric. The first two have the loops trapped between the lining or facing and the outer fabric, so they were attached while attaching the lining or facing. In the third example, the loop was attached later, as it was a last minute decision to put a button and loop at the top of the zipper. I think I attached it between between the top part of the zipper and the outer fabric.


To make fabric button loops, I usually start with a piece of thin fabric cut on the bias. (You may not need to cut on the bias if your material has some stretch or give in it.) I make it about 3/4"-1" wide, 2-3" long - longer is better, as you can always cut some off but you can't add to it later! First, fold and press it in half lengthways. Then open out the fold, and press the sides into the centre fold, and press again. In other words, you now have a strip about 1/8"-1/4" wide, with the raw edges folded into the middle. Sew along the open edge with a narrow zig zag stitch so as to maintain a little stretch in the loop.
There is an alternative way to make a thin loop for a button loop, which is described on the Sewguide.com web site. This method makes a fabric tube (as you would for much wider straps), sews them RIGHT sides together first, and then reverses them by means of pulling a thin trapped cord. I have done this, though I start with the thin cord inside the tube and attach it to one end, before pulling it through. I also use a much smaller seam allowance then is suggested on the Sewguide site.
Tab with snap fasteners
Tabs can fasten on the outside, as in the above example, making a feature of them.
Or they can fasten on the inside, and be largely hidden from view, as in this example.
To make the tabs, I start with a small scrap of fabric about 3 1/2" - 4" long by 1 1/2" - 1 3/4" wide. (That would be c. 8.75 cm - 10 cm long by 3.75 cm - 4.5 cm.). I attach iron-on interfacing to the wrong side. Then I fold it in half right sides together so it's roughly square, and sew down the two sides. I then trim the corners, and also trim the side seams to about 1/8" - 1/4". Then I turn it right sides out, using a narrow chop stick to poke out the corner, and give it a good press. The one on the left below is finished, the one on the right has been sewn and trimmed. (Note there is no need to finish the open end as it will be inside the lining or facing.)
You can then hammer in snap fasteners, sew on press-studs, make button holes, whatever you want.
The method of attaching the tabs is very similar to the method for attaching loops, and is described below.
This pink spotty tab below goes outside the dress, and is made slightly differently. I wanted a curved end, so instead of one folded piece, I used two smaller pieces shaped as I wanted. I sewed round all 3 sides, or rather, two sides and the rounded end. You'll also see that the snap fastener doesn't show on the outside of the tab as it does on the blue floral ones above. For this dress, I made one large tab, with two layers of interfacing inside. I hammered the snap through the two layers of interfacing and the inner layer of the tab, before attaching to the outer layer of the tab.
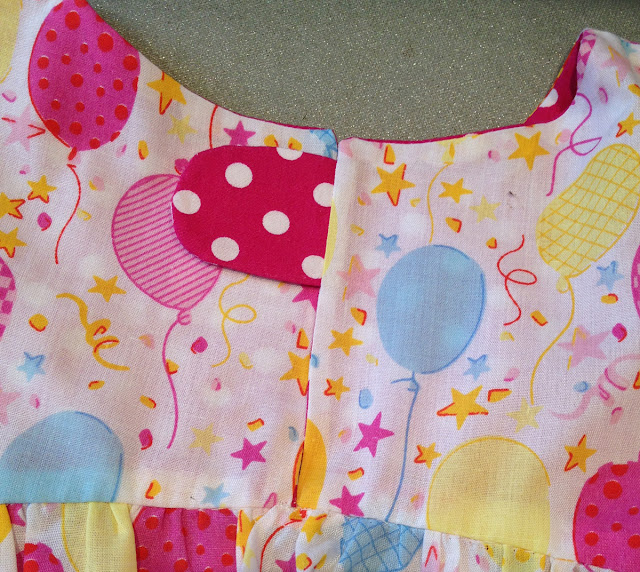
You could also use tabs like these to make a button hole, with a button attached to the other side. I usually avoid button holes. Although I have been known to make them successfully, I hate making them as the last thing you do on a garment. If you mess it up, the whole garment is ruined. The great thing about making a button hole on a tab (which you would do before attaching it to the garment) is that if it looks a mess, you can throw the tab away and try again - no damage to the dress!

Attaching button loops and tabs into a lining or facing
Most of these options I have included above should be inserted between the outer part of the neck opening and the lining or facing before they are joined together. Place the tab or loop with the raw edges towards the seam edge, and pin the facing over it. I usually baste it in place, especially with a loop that can easily twist or move, before sewing the seam.
String ties
Another way to close a neckline, especially if the opening isn't too deep, is to have string ties. If you have a bias finished neckline, it's easy just to extend the bias tape a few inches beyond the edges of the opening, and make these few inches into strings. You see on these, I sewed little bobbles on to make a feature of the opening. If you wanted a proper bow, then you'd need to make the extended strings a bit longer than these, I'd say 12" or 30cm. If you don't have a bias trimmed neckline (for example, you have full facing or a lining in the dress), you can make the strings separately - perhaps even use some pretty ribbon - and sew these under the facings or lining.
Zip
And the last way I can suggest for you to close the neckline is to add a short zip. Probably the best way would be to add an invisible zip. Professor Pincushion has a tutorial for doing this with a professional finish. So don't do as I do - do as I say!
For me, this is too complicated. I've already got an ordinary zipper foot, and I'm not about to start buying invisible zipper feet. I learnt this much easier method of installing a conventional zip from my mother. It may not look as neat, but it works for me. I don't think it looks too bad!

I attach the zip before sewing up the sides of the dress; you can see from the above photo the lining isn't in it yet.
Here it is again in the finished dress.
So if you want to find out more about my easy zip-installation method, see here. Then you can choose.


