Why would you want to make your own bias binding when you can buy it in the shops? Lots of reasons! For me, it's mostly wanting to have the same fabric for the trims as the main (or contrasting) fabric of whatever I am making. But there is also a limit to the colours and sizes and material available in the shops or on-line. (On-line purchasing brings its own special problems of colour matching and quality.) These are some of many that I've made to match (or contrast) with the main fabric in a garment.

But the idea of making bias binding yourself can perhaps appear daunting. That's why I have created this tutorial, with examples. I'll also tell you about my experiences and errors, so you can avoid the latter!
Most bias binding is exactly what it says - binding made by cutting material on the bias. True bias is cut exactly at 45 degrees from square. If you take a piece of material with right angled corners (i.e. a rectangle or a square) and fold one side diagonally so that it meets the side to which it is at right angles, the fold line will be at 45 degrees.
Why do we want to cut the material on the bias? Two main reasons. The first is that you will get the greatest stretch on the bias. If you pull gently along the fold you made above, you'll find it has quite a lot of give (or stretch). Whereas, with a woven (as opposed to knit) fabric, there won't be very much give along the selvedge or grain direction, nor across the fabric from selvedge to selvedge. So bias binding is easier to bend round curved edges, for example. But the other point is that when it comes to having joins in the binding, you get less lumpiness when you fold it over because the seam on the outer side of the garment is offset compared with the seam on the inside. We'll see that later.
First off, equipment.
Essential:
- fabric
- thread
- sharp fabric scissors
- ruler - and possibly fabric marker pen
- steam iron
Highly desirable:
- sewing machine (possible without, but how laborious!)
- bias binding maker
I have found a bias binding maker, like the one in this picture, a huge help:

You don't have to have one, you can just use an iron to make the binding, but if you plan to make bias binding more than once, it's worth it. I bought this one as part of a set of 4 different sizes for about £8, but my goodness, I've since seen them on Amazon and eBay for only a pound or two. So you've no excuse not to get one.
You first need to figure out how wide to make your bias binding. These days, I'm nearly always making double fold bias binding, which you can fold over an edge. You can also make single fold to face inside an edge, which is the same technique but usually it is much narrower. For facing an edge, the widths I use most often (finished width) are 1/2" or 3/8" (ish). For double fold half inch tape, you need strips just under 2" wide, for 3/8", just under 1 1/2". I still work mainly in inches because I'm old, but my bias binding makers are in centimetres. So the widths needed are equivalent to 50mm (c 2") and 38mm (c 1 1/2"). So I use the bias binding maker out of the set called 25mm (near enough 1") for the half inch double fold binding, and the one called 18mm (a little under 3/4") for the 3/8" biniding.
This link from Whipstitch gives you all the sizes you need.
I'll give you two ways to make your long strip of bias fabric.
Method 1 - using irregular scraps of material.
Later, I'm going to give you a link to a brilliant tutorial for an easier method than mine, that works if you have a nice regular square of material (which doesn't have to be very large, necessarily). However, so often I'm using scrappy bits, having cut out a garment already. (See pictures below.) And then you need to cut out whatever strips of fabric you can, often from discontinuous scraps.
The first stage then is to cut strips on the bias, that will look like this:

And from a rectangular-ish piece of fabric, you can cut them like this:

I suggested in my list of equipment that you might want a fabric marker to mark your strips, but I have a trick that avoids the need for using one. I put my fabric on the ironing board, fold it on the bias where I want the first strips to start, and press along that fold. Then I unfold it, and, measuring as I go, I iron in another fold just above the one I already have, the exact distance away for the width of my strips. Here's one I made earlier! I think I have already cut off the first strip or two on the left. (This fabric is actually a knit fabric, but I particularly wanted a matching binding. It took the creases pretty well.)

Now, here's something important. You'll notice in the picture above that the first four strips from the left have nice 45 degree angles at the end, parallel to each other. But if you look at the last two strips, you'll see that the bottom / right hand end is not parallel to the top - in fact it angles the wrong way, because I've come to the end of the fabric. So those two pieces will have to be cut shorter to ensure I have parallel ends. The red lines below show how that would work.

Don't be tempted to cheat on this (as I have often done myself). It is so not worth it.
Idaelly, you'll be using a decent size piece of fabric to cut your strips. I've sometimes had to make do with a lot of tiny strips because I'm so short of fabric. This is not to be recommended, but it shows what can be done!

Then cut all your strips, with your nicely diagonal ends.

Once you have a whole heap of strips, you need to pin them right sides together, thus:


You'll see that the strips just slightly overlap at the ends. The stitching line is shown as a dotted line below. It's a good idea to sew back and forth at the beginning and end of each line so it doesn't unravel. Or, if you prefer, you can knot the ends of the threads with a reef knot, before cutting them off.

If you have cut all your strips nice and straight, and your diagonal ends are all nice and diagonal, and you've overlapped the ends as I've shown - then you are going to have a nice long piece of bias fabric strip. Press all the seams and trim off the corners that are outside the edge of the tape.

Method 2 - with a regular square of at least 8.5" (or 14.5", or 20.5")
I promised you an easier method. You can make a continuous bias binding strip with only 2 seams, eliminating the need for piecing together all those little tiny strips. (This piecing of little tiny strips has to be done so carefully to get them all exactly lined up, that it can be time consuming. Though I'd always argue, worth it if you haven't got a decent sized square.)
I'd seen the method a couple of time but never really got to grips with it, until I found this tutorial from makeit-loveit. It is so well explained, with really good diagrams, that I offer no further explanation - just look at the tutorial. However, if you realise you aren't going to have a suitable size square for your needs, you may need to come back to method 1. I should also add that the tutorial specifically covers 2" wide tape (producing half inch double fold bias binding), and you'd have to recalculate for a different width tape.
Making a long bias strip into bias tape
Now, you have two main ways to make this long strip into bias binding. If you have bias binding makers, as I've recommended, then that's the easiest way. But they don't work so well with thicker fabric or some other fabric, so I'll also show you what to do if you can't use a bias binding maker (or you don't have one!)
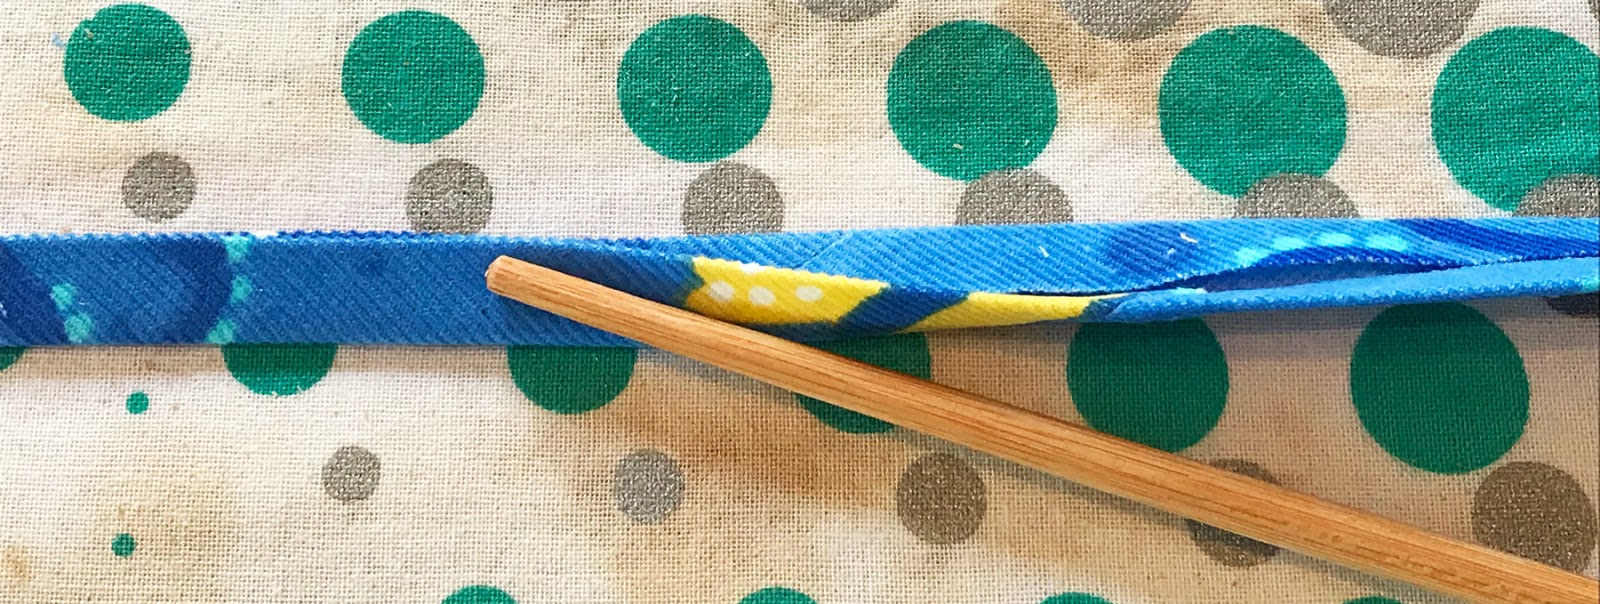
First, with the bias binding maker, you feed one of your pointed ends thruogh from the wide side of the maker. I find it helpful to use a cocktail stick to ease it through, poking it down the groove. Once the end is through it's easy to pull it.

However, don't pull it all through just yet! Next, you need to get your iron on, and put it on the point you've just pulled through the bias binding maker. Sorry that I've not included the iron in this next picture, you'll have to take my word for the fact that it's on the left of the photo.So starting steaming away as you gently pull the maker away from the iron and along the long strip. Keep checking that it is feeding through evenly.

If you are making single fold tape, you're done! If you want to make double-fold, you need to fold it over again. I'm sure there are fancier (and more expensive) bias binding makers available that will do this all in one, with a simple piece of equipment like you just need to press the whole strip again, doubled over. At this stage, I tend to roll it up to keep it in its nice creases.


And it's all ready to use! (Wait for another tutorial on how to use it.)
At this point, if you look at it closely, you'll see what I meant earlier about the joins in the binding. Have a look at this:

If you take note of where the join seam falls on the top fold, which will be attached to the garment, you can see that the seam is well offset to the right, on the bottom fold (partially open so you can see). So you don't have the lumpiness you would have if this was just a straight seam folded over.
OK, now let's suppose you don't have a bias binding maker, or your fabric is too thick or awkward to use in a maker. The first thing I do is to press the whole strip with the iron in half along its length - so the end on the right has been pressed, the end on the left has yet to be pressed. This is a fine needlecord.

The next step is to open it out, and fold one edge towards the middle crease, and press it again.


Then, repeat this on the other edge.


And finally, double it all back over again, if you are making double-fold tape.

You can coil it up, as we did when making it with a bias binding maker.
Some fabrics are too springy (like many knits) or slippery (like silks, satins and many man-made fibres) to make successful bias tape using either of these methods. In other words, they don't hold the creases nicely. Sometimes when this occurs, but I really do want to use a particular fabric, I make my long bias strip as usual, but then, instead of folding in half first (which probably won't stay put anyway), I tend to fold the sides into the middle and run tacking threads along to hold each of the two side edges down as I press. I'm sorry I don't have a picture to show you of this. I then fold it in half again by hand, and roll the tape into a coil as before, putting a pin through to hold it together until I'm ready to use it. Of course, you have to pull the tacking stitches out as you pin the tape to the garment, but by then it will hopefully be cowed into submission.
Happy tape making!
PS I found this, from So Sew Easy, a useful explanation of how to join the ends of bias tape as you attach it.
No comments:
Post a Comment