This lovely 100% cotton fabric was chosen by chosen by one of my granddaughters when I had promised her a new peasant dress.

It is quite a thick cotton, and even after washing, I thought it would actually be less suitable for a peasant style dress than if it had been thinner material. However, I'm quite pleased with the finished result, with pleats around the neckline rather than gathers, and it has certainly been worn a lot.
I started with Its Always Autumn. I've used her regular 4T pattern for a number of peasant dresses and tops. However, I needed a larger size this time. So I embarked on a mash-up of the Its Always Autumn pattern, which I know and have used, and the free peasant pattern from Scattered Thoughts of a Crafty Mum, which I hadn't used, but which has more sizes.
I used size 6.
I cut a tunic length from the Scattered Thoughts pattern, so I could add a frill. Jane likes a frill. When it came to the sleeves, I thought the complete puff or long sleeves would be too warm for summer (plus I was going to be short of material!) so designed my own flutter sleeves. These I made from the regular sleeve pattern, shaped into a fan (see this post on the slash and spread method), and then I scooped it down by eye so that it would only cover the top part of the armscye (in other words, it wasn't going to go round under the armpits). The red lines show the final shape, which still maintains the required neckline over the shoulders for gathering.

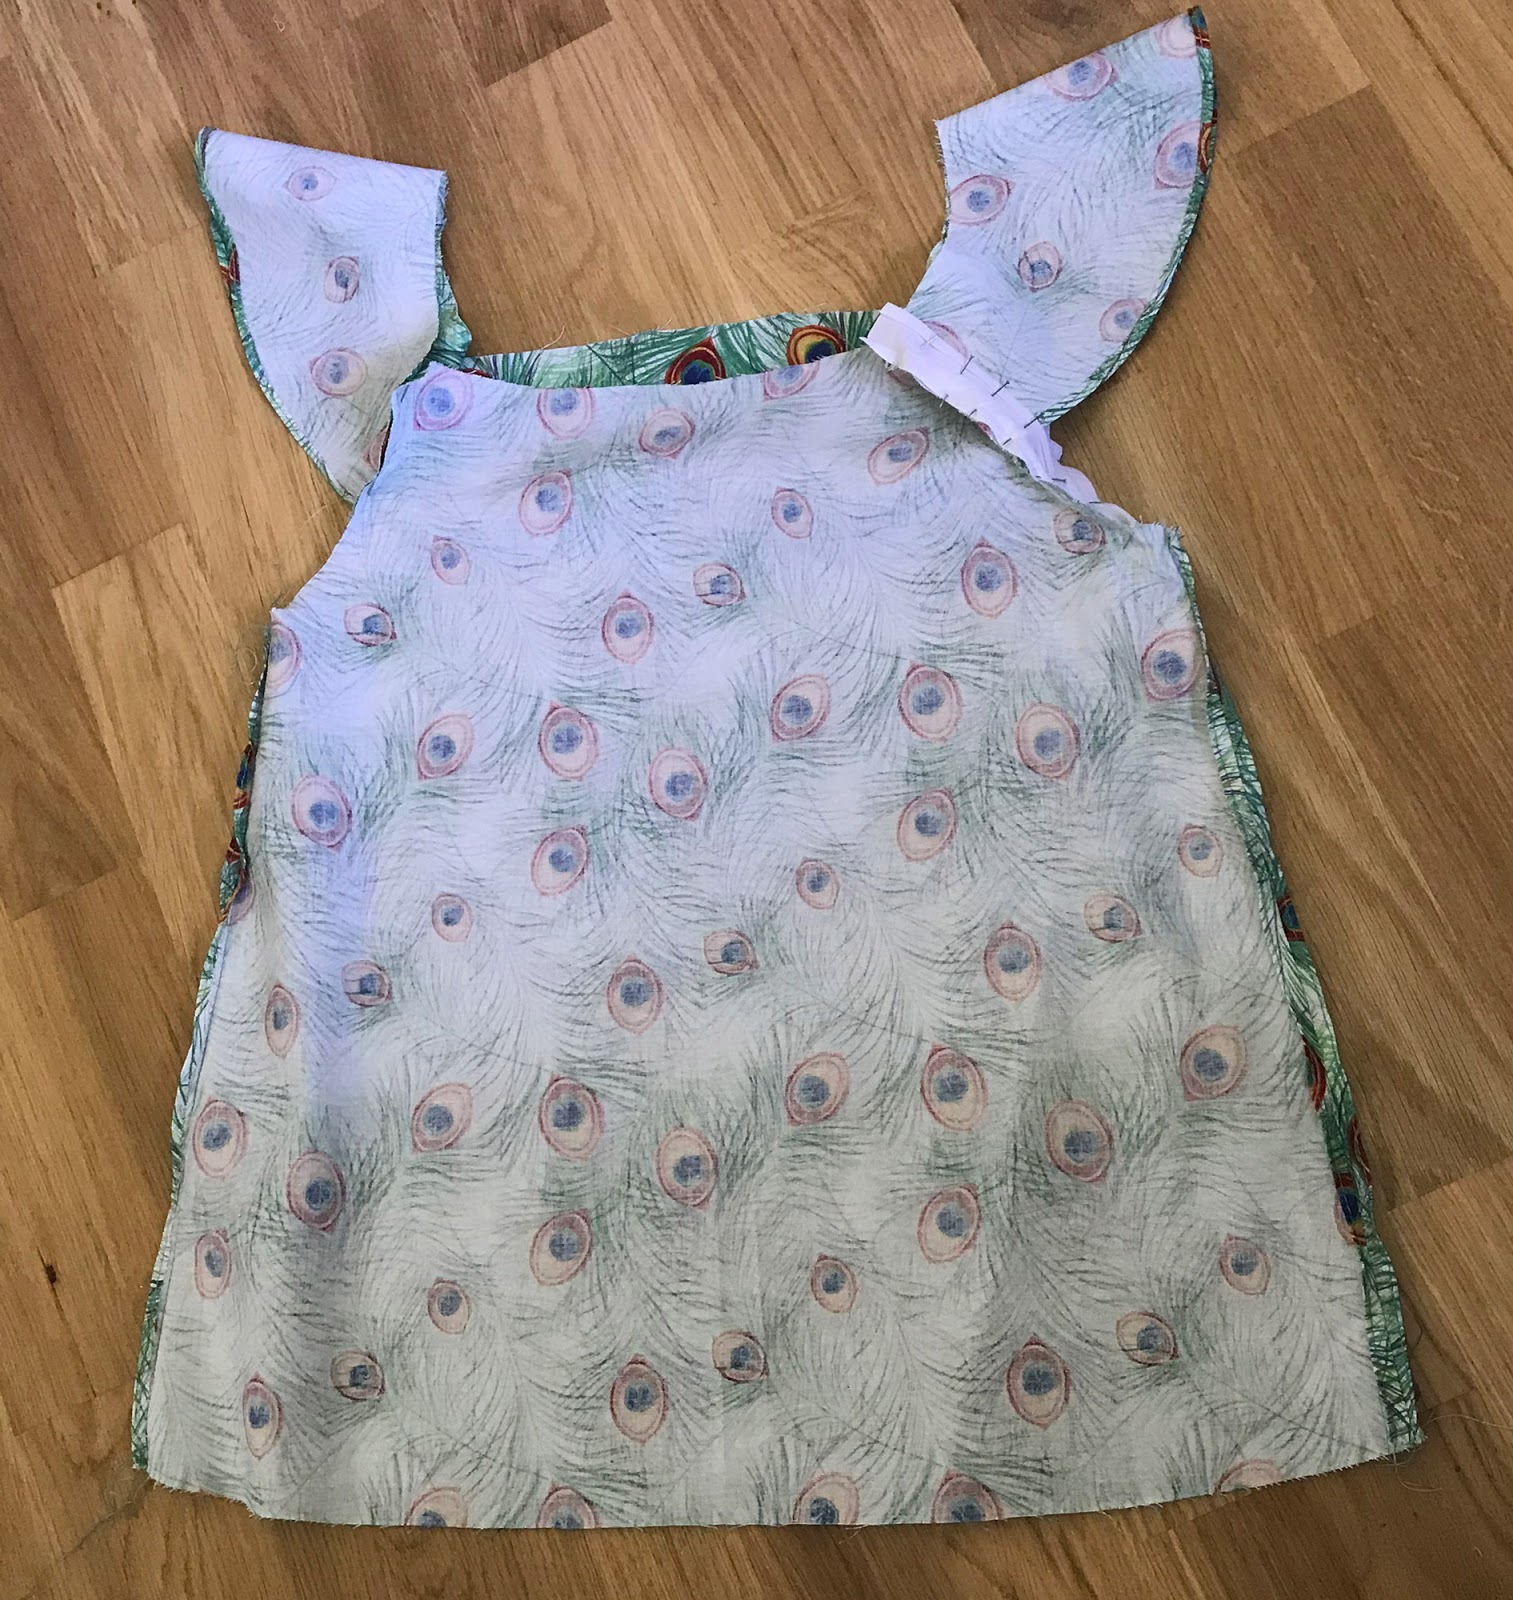
Having cut out the two sleeves on the fold, I hemmed the lower edges. I also sewed up the side seams of the dress.

I then turned back to the Its Always Autumn tutorial, because I liked the method used there to attach the flutter sleeves, by using bias binding. This gives a neat inside. You'll find the full I.A.A tutorial here.

The bias tape, sleeve and dress top were pinned together with the sleeve and dress right sides together. I've found it's worth pinning it all first so you can check everything is the right way round and you haven't got the sleeves upside down or inside out or something! This is one of the arm bindings ready to be sewn.
I then clipped all the curves........

..... before turning the bias binding over and finishing the armholes.

When it came to making the neckline, I considered both tutorials. For the Scattered Thoughts design, she just turns a hem to make a casing for the elastic. Possibly, I should have done this too. (Though I'm not unhappy with the final result.)
The Its Always Autumn pattern instead adds bias binding to the edge (as for the armholes) to make a casing that way, and this possibly added to the thickness. At this stage, I was planning a gathered neckline. I left gaps at each of the thick seams to help guide the elastic through the neckline, rather than just leaving one gap.

When I'd done it I didn't like it, the neckline looked really bulky. This 100% cotton fabric was almost like linen, very pretty, but much thicker and stiffer than I'd expected.

So I looked again at the Its Always Autumn website and found the variation that uses a pleated neckline rather than gathers, and I thought this would lie flatter. So I ripped off the elastic and the binding from the neckline.

The web site gives instructions for pinning the pleats. I did find it a bit of a nightmare pinning them, because I kept hitting a seam. In the end, I ignored measuring it, and just went a bit ad hoc. I started at the centre of the sleeves and moved outwards, stopping when I reach the seams, and did the same from the centre front and centre back. So over the top of the sleeves there's a sort of box pleat where the pleats change direction. It did look good, though. Then I added back a much shorted length of bias binding tape. However, I just couldn't get get the neckline back down to the 21-22" neckline the elasticated one would have been. In the end I used the same bit of elastic through that I'd pulled out. The neckline was not nearly so bulky now - there was just a slight elastication to make the neckline a bit snugger.
With the pleated neckline, there is less give, so you need to put in a little neck opening at the back. I made a little ribbon loop and attached a button. My opening was a bit longer than suggested by the I.A.A tutorial - about 6". Jane gets quite anxious if she can't easily pull a dress over her head and shoulders, so a longer opening works well for her.

And finally, I added a deep gathered frill to the bottom. Jane is the one of my grand-daughters who most loves frills. I just gathered it using the remaining bits of fabric. I actually had to turn the fabric sideways to get enough. That's the advantage of using a good quality woven with a not too obviously directional pattern. If you look at the photos of the finished dress, my guess is that you hadn't noticed the change of direction on the frill till I pointed it out, had you?
I had to do a bit of guessing at length, but there was no time for trying the dress on, as they were off on holiday the day after I finished. I thought I might to shorten it, or let the hem down later. I the event, I didn't need to lengthen or shorten it - it was a perfect length for her. And she loves it!


I'm pleased to say I've seen photos of it being worn on many different occasions.

And it apparently also works well for beach football with wellies!

This is not the first peasant dress I've made, and it surely won't be the last. But I think in future I'll choose a thinner fabric, and keep these stiffer cottons for something else, in spite of the happy result.
Just a footnote about the two great patterns I used to make this dress. They are both excellent PDF patterns (free!), which both have very good and detailed tutorials, and both have lots of lovely ideas for variations - it's amazing how many different styles you can make from a peasant dress pattern. I'll re-iterate the links here.
Its Always Autumn Is limited to size 4T, but that hasn't stopped me using it for slightly younger or older girls, and I found it very reliable. I like the flutter sleeves idea, and the pleated neckline idea, among others. This pattern had a top length as well as a dress length right from the start. I've given the link to the pleated neckline version here, because it's easy to work back to other earlier versions from here.
Likewise, for the Scattered Thoughts of a Crafty Mum pattern, the link is for an updated version, from which you can work backwards. This one has multiple sizes for girls, long and short sleeves versions, and again many variations. So I recommend both patterns, and say thank you to both the authors!
No comments:
Post a Comment