I make a lot of tops and dresses for my grand-daughters that call for a lining or a facing. This may be a facing round the armholes and the neckline........
... or one that just covers the neckline .........
.... or it may be a fully-lined bodice, seen here from the outside .....
.... and the inside.
This is often a good way to fashion a front or back opening with tabs or strings as closures. But it may not be self-evident how to incorporate these features neatly. If you haven't done this before, here's how.

This is a facing prepared for a knit dress, not yet stitched on the shoulders seams (at the top) which has had some fusible interfacing attached to give the neckline some support. I usually do add fusible interfacing to a neck-only facing, whether woven or knit fabric. You can see the back facing will go down the back opening of the dress. The interfacing also gives more support for adding a button or a snap fastener.
Lay out the outer fabric face up.
If you want to have a closure tab (like the ones in the pictures of the blue and white dress above) you now need to place them on top of the outer, with the finished end of the tab pointing towards the armhole and the raw edges of the tab towards the opening of the dress. (It doesn't necessarily need to overlap as in my diagram, I've shown it like that to make the next steps clearer. But it does need to be placed so that it adequately overlaps the seam allowance of the opening.) You might want to pin it in place.
Now, place the lining (or facing) face down on top of the outer fabric, so the two are right sides together, and the tab is in between. Match all the neckline curves, and the armholes (if there are any), and the edges of the opening. Pin it all round, or use clips to hold the layers together.
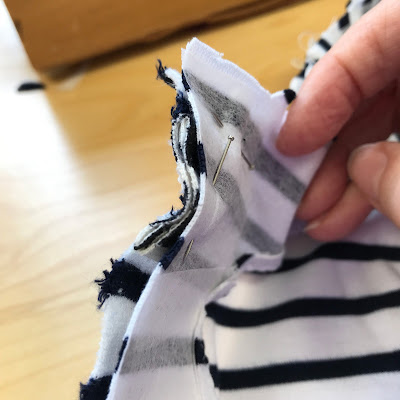
Although it may be a bit hard to see, here is the tab on the black and white dress inserted between the outer fabric and the facing.
You are now ready to sew the neckline! Stitch all the way round from the bottom of the facing or lining on one side, round the neck, and down the other side. If it's a fully line bodice, you can also stitch the armholes from front to back (or vice versa). Don't stitch down the side seams, though!
Before you attempt to turn the bodice the right side out (or turn the facing to the inside), trim and notch all the curves (being careful not to cut through the seam lines). This will help neaten the seam edges. While turn the facing or lining, I find a thin chopstick pushed into the corners can help get them into nice right-angles. If you have a facing, just turn the facing to the inside, and press the edges nice and flat. If the bodice is fully-lined, you are going to pull one back bodice piece through one of the shoulders to turn it inside out, and keep gently pulling until the whole bodice is the right way out. If you find it works better, you can open one back bodice and pull it over the front, easing the front through, followed by the other back bodice. This may seem a little fiddly at first, particularly if the shoulder seams are quite narrow, but with patience, it works.You can then top-stitch if you want - I usually do.
And now your back bodice will have the tab the right way out, too, neatly encased in the back opening seam. You can make a button hole in the tab, with a button on the opposite side, or use snap fasteners,
Now you can join the side seams. Pin the outer front side seam to the outer back side seam, and the lining front side seam to the lining back side seam, for both the left and right sides. Make sure to match the armhole seams. Then sew a single seam from the bottom of the outer side seam to the bottom of the lining seam.
Lay your strings again with the finished end towards the armholes of the bodice. (You would normally have strings both sides if it's an edge to edge opening.)
Place the lining right sides together on top of the outer.
Sew round as before, and clip the edges. The picture below is from one of my wrap dresses, which just have a single string on each side of the long part of the wrap. (Two more strings need to be incorporated in the side seams for these dresses, as the front overlap, and one fastens on the inside and one on the outside.)
Then turn the bodice through as before, and press.
A wrap dress made using this method.


No comments:
Post a Comment